I'm currently working on the summer tote bag that I want to get ready this month. The design was born a while ago, but the main problem was to pick fitting stitches for it. My all-time faves among the line stitches have always been stem stitch and split stitch, so at first, I was going to employ one of them. As usually. But then I thought... Isn't it unfair that I give so little chance for chain stitch to shine in my embroidery?
This is a truly wonderful stitch too, it gives nice solid lines and has that fun “crochet” look. Except that.... it is a bit tricky in some ways ;)
So, today I'd like to share some tips that I find really helpful for those who struggle with this stitch like I did. In this post, you will learn how to work the curves with chain stitch, make the corners sharp, join up the ends of shapes, save the thread and other important stuff. Away with hesitation! Let's learn how to kill it when you chain stitch!
First and foremost, if you forgot or don't know how to work chain stitch I recommend going to this post where I explained it step-by-step along with reversed chain stitch (this will be important later on!).
6 tips for better chain stitch:
1. Thread tension

Chain stitch consists of anchored loops. Each stitch is a loop. The thing that is essential for the correct form of each of those loops is the right tension of thread. It shouldn't be too lose, but also shouldn't be too tight. It should be.. relaxed! Don't tighten the stitches too much and it will be alright. Your thread also shouldn't be twisted. You know, sometimes when you stitch, after a while the floss gets twisted – it should be avoided for a nice look of the chain stitch. Remember this, as you will be chain stitching.
2. An invisible start
Every time you start embroidery, the first thing you need to do is secure your thread on the backside. Now, it is pretty simple to do with a knot, but what if you aspire for the “clean” backside? The task is all more difficult when you use chain stitch on a line and not as a filler. Then here's what you can do:
Bring your needle up to the top of the fabric, leaving a short tail of it on the backside. Do it somewhere down the line, not at its starting point.

Make a couple of tiny running stitches on the top of the fabric. I actually grabbed only one grain of fabric with my stitches here, so they can be really tiny and it will still be enough to secure your thread.

Now you can go to the start of the line and start embroidering. Chain stitches will cover these tiny stitches making them invisible. Later you can trim the tail that was left on the backside, to make it shorter and less noticeable.

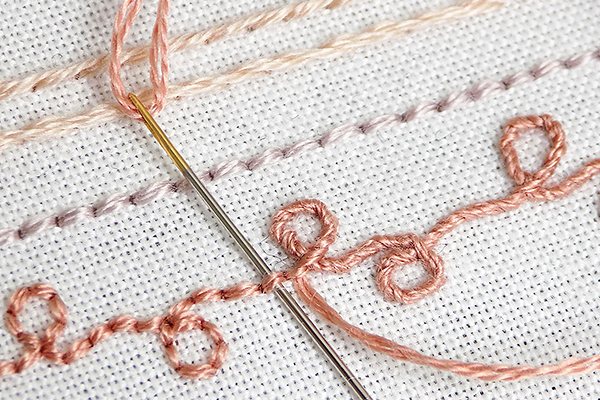
3. Conquer the curves
Linear designs often have curves, don't they? When you use chain stitch, you should remember that every new stitch in it starts inside the previous one. And it is rather thick (at least compared to other line stitches). So, if you want to have a nice curve here's what you do:

Make a new stitch that misses the curve a little. Note how this stitch in the picture above goes inside the leaf shape and doesn't follow the correct place to turn right. Instead, it is perpendicular to the curve. That's the trick.

It is only the new stitch, that will start from inside the previous one, will turn right and form a smooth curve.
4. Making the corners sharp
Chain stitch is a bit blunt (that's why we needed that trick for the curve). But there is a way to make it sharp. Remember how we finish chain stitch line? With a tiny anchoring running stitch. Similarly to lazy daisy stitch. We do the same when we want to achieve a sharp tip – for example, in a leaf shape. We finish the line with an anchoring stitch and start stitching again from inside the previous stitch.

5. An invisible join
To be honest, that was one of the biggest revelations for me, when I was learning chain stitch!
It is common for linear designs to have various shapes that will need a proper closure, so it's often inevitable that you might run into the start of the line that you stitched prior to that. And... the only way we know about ending the line of chain stitch is to anchor the last loop with a running stitch. But... if you join up the end of a shape this way....

It will be too evident.
Good news! There's a better way. Now, this is where we need to remember about existing of reverse chain stitch and how it is worked. If you can't recall it, go to this post. When we work chain stitch backward we pull the needle under the previous stitch. So, this is exactly what you need to do for a nice join of the shape!
Pull the threaded needle under the stitch at the start of the shape...

And the join in invisible now!

6. Economizing with reversed chain stitch
If you are like me, then you probably want to avoid wasting thread on unnecessary movements across the pattern. For example, when you stitch vertical lines and you just finished one and need to start another one – isn't it way better when you can just take a step to the side and start moving backward? Instead of going back to the bottom and start moving upwards again? Well, you can do that with chain stitch!
In fact, I already spoke about stem stitch in the same context here. Both of these stitches (and some others too) allow moving up and and down without noticeable changes in the appearance of the line. In case with chain stitch, when you just finished a line worked in a direct chain stitch, you can step aside and start the neighboring line with reversed chain stitch, beginning it with a running stitch. (read here, if you forgot or don't know how to work it).

The lines look the same and you just saved your thread!
Although, it will be tricky if you work the lines very close to each other. When pulling the needle under the stitches, the tip of it can touch neighboring stitches and harm the thread. So be careful with that!
I hope these tips will help your chain stitch truly shine in your embroidery! I'm having a lot of chain stitch practice with the new design I'm currently stitching. And if you need some linear pattern for practice, you can always download this freebie. I wonder how it would look like if worked in chain stitch??
Do you have any struggles with chain stitch or other stitches? Maybe you could share some tips? You can do that in the comments section below the post!