
You probably spotted before all these beautiful roses or lavender flowers worked with bullion stitches? This stitch was a fantastic discovery for me.
Despite its peculiar look, it is actually wonderfully versatile – it's used for stitching flowers, hair (including braids), rye, caterpillars and it is also a component of many compound stitches. For example, the bullion picot buttonhole edging.
You can also play with its size and shape, so the possibilities for its use in hand embroidery are very wide. It is a little tricky to stitch though, so in this post, I will share a bullion stitch and bullion pistil stitch tutorials as well as some universal tips on how to get it done right.
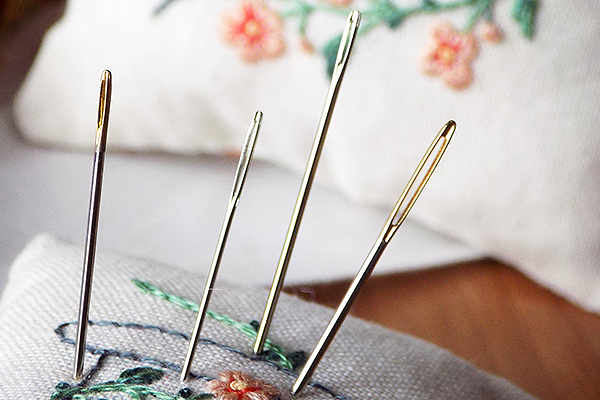
The first thing you need to know for a successful bullion stitch – not every needle will fit it.
When I was first learning to make bullion stitch that was the reason why I always failed. I followed the instructions thoroughly but every time I got some messy lump instead of a nice bullion. But the moment I switched to another needle – it all worked like magic.

So, the needle you need must have a narrow eye of the same diameter as the shaft. In embroidery stores, they are usually called Milliners or straw needles. In the picture above the two needles on the right are the ones that I can work with to make a bullion stitch. The rightmost one is the old needle I accidentally found at home, which was used by my Mum before. Thank God, it was a real miracle because I found it exactly when I was struggling with bullion stitches, feeling frustrated and exhausted and it really saved my day. The leftmost needle is an example of a needle that doesn't fit for making bullion stitches – its eye is slightly wider than the shaft.
Now, let's get started with the stitching.
BULLION STITCH TUTORIAL

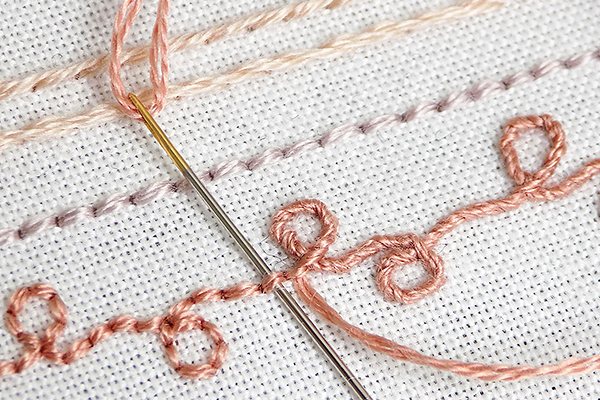
First, bring the needle up through the fabric at point A, then insert it at the point B and bring back up again at A. Don't pull the thread through yet – leave the working end of it on the surface of the fabric. The distance between points A and B will decide the length of your bullion stitch.

Wrap the working thread around the needle's point, carefully tapping them with your thumb and pointer finger as you do that. The twists shouldn't be too tight, but not too loose either – the tension should be “relaxed” enough for the needle to pull through them.

Now, holding the twists with your thumb and pointer finger gently, pull the needle through them until the bullion flips toward the point B. Then insert the needle at point B. Your bullion stitch is ready!
BULLION ARC

You can vary the shape of your bullion stitch by shortening the length of the stitch and increasing the number of twists around the needle.

BULLION PISTIL STITCH
Remember french knot pistil stitches? We can make pistil stitches with bullion knot as well. You can see an example in this Dancing Poppies embroidery I made a while ago.
There are actually two ways of making a bullion pistil stitch.
First:

Make a short bullion stitch and....

when it is ready, insert the needle on a distance from the B point, creating a sort of a tail.
Second:

When making a bullion stitch grab as much fabric as you will need for the pistil stitch including its tail. BUT make only a few twists around the needle.

When you pull the needle through them, move the wraps back and insert the needle in the fabric where the twists end.
If you are a beginner and still struggle with bullion stitches I would recommend the first variant, because some experience is necessary to learn to manipulate the twists like in the second method.

Few tips for making successful bullion stitches:
- Needle! Without the right needle, you won't get the right bullion stitch.
- When you are wrapping the thread around the needle and you think the length of twists already matches the distance between A and B points, add few more wraps. Because it is better to make the bullion stitch a wee bit raised than make less twists and get a messy bullion stitch.
- Check the tension of the twists.
- After you pulled the needle through and the bullion lay flat, use the needle's eye to “poke” slightly the bullion stitch and fix its shape if necessary.
I am strongly convinced that bullion stitch is one of the must-have in your embroidery stitches range, that's why I consider it as a basic stitch. Although making one is a bit tricky, I hope the tips from this post will be helpful for your stitching experience to be easier and more joyful!
And if you still struggle with bullion knot try Bullion knot crash course ;)
And if you still struggle with bullion knot try Bullion knot crash course ;)
And the rest of the stitches you can check on this page :)


No comments
Write what you think! ❤
Note: Only a member of this blog may post a comment.