Recently I ran through the stitch directory here and then it hit me that I've covered all of the line stitches on my blog, except for the most basic one – running stitch.
How did I even skip it?? It is actually one of the essentials of hand embroidery, so we better not miss this part, haha.
That's why today on our agenda is taking a closer look at the running stitch: how to work it and how to make the most out of it.
How to work running stitch
As I said, running stitch is one of the basic stitches in hand embroidery, so accordingly it is rather easy to work. Let's see it step by step.
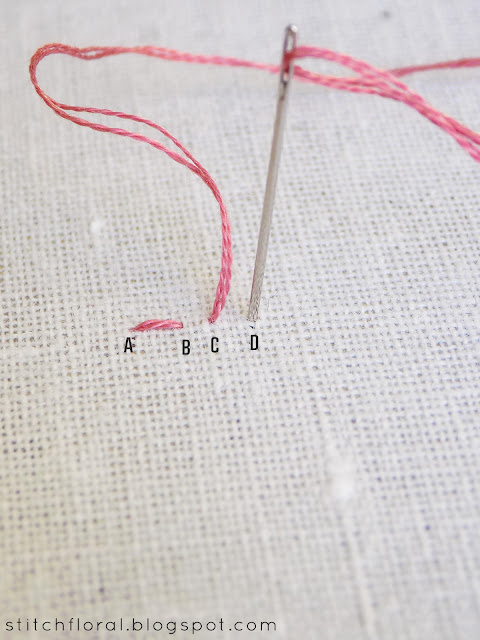
First, bring the needle up at the starting point of your line (point A) and then bring your needle down in a distance from where you started (point B). This way you made a straight stitch (A-B).
To continue the line, bring the needle up through the fabric again at a distance from the previous stitch and make a new one (C-D) following the steps before.
As you keep going you will get a line of straight stitches. You might want to keep them the same size and placed in the same distance from each other, to make the look of the line more consistent,
The previous steps explained how to work running stitch using a stabbing method where the needle pierces through the fabric up and down. However, it actually might be easier and MUCH faster to use sewing method when working it, just like in the picture above. It also helps in case you're using a patterned fabric where it is hard to keep the line straight - needle's shaft serves this purpose excellently!
Variations
Despite its.. well, rather simple and plain look (let's be honest), running stitch is often used as a decorative stitch. Although, as you might have guessed, not in its original form, but after dressing it up just a tad bit.
I will mention only a couple of the easiest ones, but you can find a sea of possibilities of mixing it together with other stitches to create pretty borders!
So, first of all, you can just whip the running stitch with a thread of a different color. For the whipping to be successful, just slide the needle under the stitches in the same direction every time – either only upwards, or only downwards.
Another technique is called weaving. It is also based on sliding the needle under the stitches, except that the directions vary every time. First upwards, then downwards, again upwards, and so on.
Pretty and easy, huh?
Functions
In hand embroidery running stitch is essentially used for the decorative purpose. It can be used for working straight lines, but also any kind of curves and even as a filling stitch.
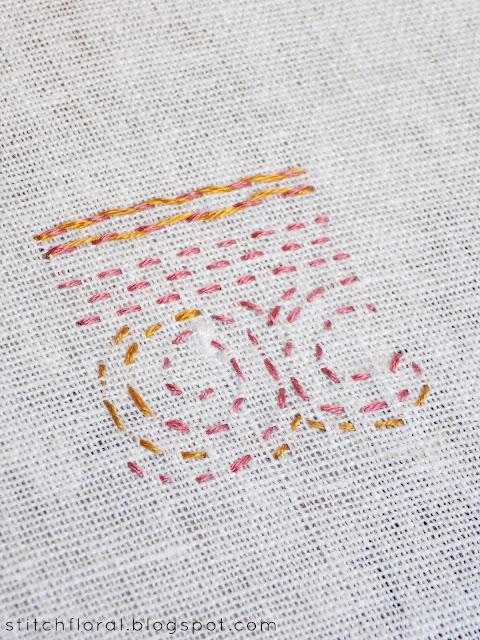
If you want to use the running stitch as a filler, you can make a pattern out of it. The easiest one would be rows of running stitches with a brick effect, where the stitches in the lower row are placed in the space between the stitches in the upper row, you know?
Here I just quickly drafted some circles to demonstrate that the lines and patterns don't have to be straight. Well, I will mention more about the patterns a bit later.
But apart from a decorative function, running stitch is also really handy in many others ways. It is frequently used to sew two or more fabrics together, to hold them together while machine sewing (instead of using pins), in hand quilting and also in applique. It is basically the stitch for basting, so yes, anywhere where basting is applicable, running stitch can be used.
Sashiko
Japanese stitchers actually can be considered the masters of employing running stitch in both decorative and functional use. Sashiko – is a type of folk embroidery in Japan, which has been used for darning and hand quilting for many years now. The interesting part, though, is that stitchers apply running stitch in various patterns to make the hand quilted things prettier.
Today Sashiko is still as popular as ever, and I would say, even really trendy! It kind of combines the minimalism of embroidery: rustic and rough fabric (usually navy blue) and simple white thread bringing forth a repetitive graphic pattern.
Sashiko patterns are amazing. Just amazing. They might look complicated to work but essentially they consist merely of running stitch (with some rare additions).
How cool is that? The whole set of patterns based only on one stitch! So inventive!
So, in the part earlier where I mentioned using running stitch as a filler – if you want to try that, just search for sashiko patterns. Surely, there is a number of tips and secrets for this craft, but I'm not a pro at this, unfortunately. So if you want to explore it further, I would recommend buying books or reading some articles focused exactly on sashiko.
So, that's it for today. Such a simple stitch but so many ways to apply it, right?
Yup, the wonders of hand embroidery.
Lastly, let me remind you about the free stitch along that starts on January 12th! I accept applications till Thursday, January 11th, so if you didn't apply yet – you can send a message through the contact form or write me on e-mail aminakdesigns@hotmail.com. There are more than 30 of us right now, so I hope we will all have a nice and productive time together!


No comments
Write what you think! ❤
Note: Only a member of this blog may post a comment.