I guess many of us have
experienced the “Wow!” moment when we saw beautiful
needlepainting pieces? Some of these works are just so gorgeous it
takes your breath away! Needlepainting is a very intricate technique
which requires a ton of practice, but you can master it even
if you don't have good drawing and painting skills. The one thing,
though, that you need for sure is a good understanding of how long
and short stitch works. And that's what our lesson today is about :)
Don't be scared
I know that many stitchers
are afraid of long and short stitch because it seems so difficult and
tough. Well, it has its difficulties, indeed. I wouldn't call it a
piece of cake. But it's not something to be afraid of. It is
something that needs to be trained, the same way as with any other
stitch and embroidery technique.
As for me, long and short
stitch is on the same level of difficulty as satin stitch. The way
they are worked are entirely different, but both have their
peculiarities and certain sides that require a lot of practice to get
it right.
That being said, still,
long and short stitch is really fun! I mean it. It's really fun to
see how the colors blend and create together something unique!
So, if you are holding
yourself from trying it, just because you think it is “too
difficult for you”, or you “don't have a talent”, or any other
excuse you find for yourself, just take a deep breath and make the
first step: take your hoop, fabric, needle and 3-4 favorite shades of
thread.
And then follow the steps
below ;)
How to work long and short stitch?
My favorite shape for
practicing long and short stitch is a petal. Because it allows to
practice layers which are not just plain horizontal but have an “arc”
shape. Plus the direction of thread is also not 100% vertical –
your stitches are always slanted a bit.
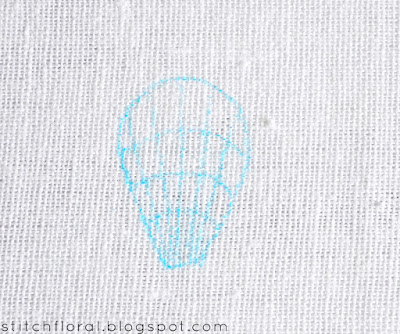
Before you start it's
always a good idea to draw a grid as a guideline for your stitching.
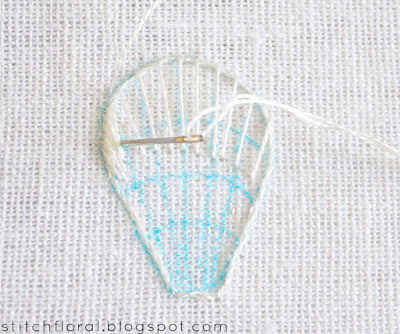
For the next step it is
common to outline the shape with a line stitch. I usually use split stitch, but stem stitch will fit as well. It will make your shape a
bit raised and will make it easier to achieve a crisp edge.
Next step is optional, but
recommended for beginners. You can make the guidelines from the
actual stitches.
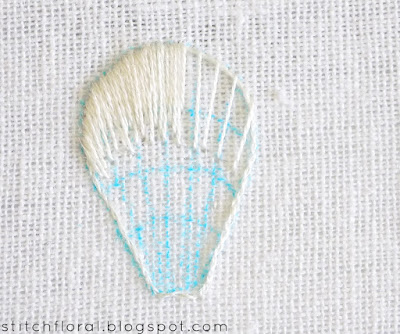
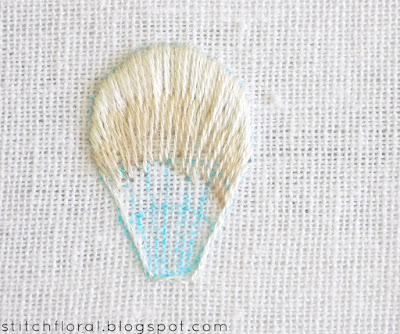
And then start filling in the
gaps between them with long and short stitches. My “short”
stitches here end on the line in the grid...
…. and my “long”
ones end in the middle of the next layer.
Your stitches don't have
to always end in the same place though. You can see that I make my
edge a bit ragged – the length of stitches varies a lot.
After the upper layer is
finished....
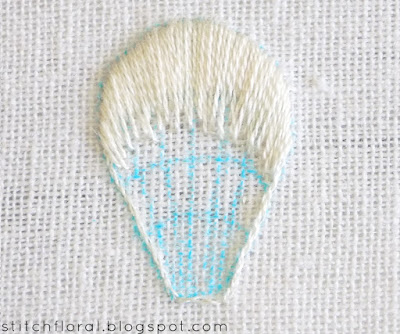
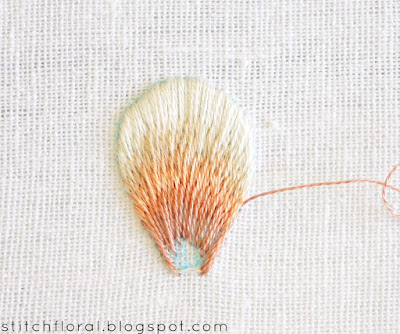
...it's time to start with
the next one. I make a lot of long stitches of approximately the same
length – they are my guidelines.
Then I fill in the gaps
between them varying the length of my stitches.
The same way I stitch the
third layer.
With the last layer I do
the same thing: stitch the longer guidelines first, and finish the
edges on the sides.
Then fill in the gaps.
Tips
1) My first and main tip is
to look at those who mastered this technique and shares their
knowledge. Trish Burr is, probably, the first one you should learn
from. I strongly recommend her book “Long and short stitch embroidery. A collection of flowers”. I am a happy owner of
one and I can't express how insightful and inspirational it is! It
has a lot of diagrams, tips, chewing out the process for you in a
very detailed manner. There is also a bunch of tutorials for
practice. Well, it's not a book review post, so I will end it here.
But, trust me, buying this book is worth every penny!
2) Lots of diagrams on long
and short stitch out there show that you should start the stitches
for a new layer in the same place where the stitches from the upper
level end. You know, in the same “hole”. It didn't work for me,
the holes become loose and it just doesn't look right. So, I actually
often split the stitches from the upper row. Most often I split them,
sometimes I come up in between of two upper stitches, and very rarely
I indeed come up where the upper stitch ended – in case I'm sure
that it will look okay.
3) Stitching guidelines is
optional, of course. Actually, they can be a pain sometimes, if the
tension is not right. But if the stitch went loose, you can pierce it
when you stitch the lower level and it will bring it into place ;)
4) I really recommend making
the edges of your layers a bit ragged and keep the length of stitches
inconsistent. I think this makes the blending a bit more natural. But
that's something that depends on each individual's taste I guess :)
5) Practice, practice,
practice. There's no such stitch that won't give in if you put enough
effort into practicing it. Remember, that even the needlepainting
masters have practiced a lot to get where they are now. So don't be
discouraged, you can totally get there too!
Any other questions? Feel
free to write in the comments below!








Thanks for your the practice tutorial and some tips - that's what I needed :)
ReplyDeleteI'm happy if it's helpful! :)
DeleteGracias muy bien explicado saludos desde Argentina
ReplyDeleteGracias! :)
Deleteadorei a sua explicação! :)
ReplyDeleteobrigado! ❤
DeleteThis is so great! Thank you so much! I have been looking for a good long and short stitch tutorial for ages and finally found you. Most of the tutorials on YouTube have very little verbal instructions and the videos are too fast which in my opinion defeats the purpose of a video tutorial. Thanks again 😊
ReplyDeleteHola! Hello from argentina. Thank you for helping us with this! Very useful... I find this stitch yo be very hard at least for me... I can't make it look nice :( bit I Will keep practicing. A big hug.
ReplyDeleteNo problem, I'm very happy if it helps :) Don't worry, my long and short stitching also wasn't that nice at first. Practice makes perfect! You can do it!
DeleteThank you so much. Your tips are very useful.
ReplyDeleteThank you for reading :)
DeleteThank you, your tips are very helpful. Can you please let me know if I should use single thread or double thread when doing long-short stitches?
ReplyDeleteIt will work in both ways. Using 1 strand of thread usually gives a more delicate look, that's the only difference :)
DeleteImpressionada com a qualidade desse tutorial! É didático, simples e completo. Parabéns pelo gesto generoso de compartilhar seu saber conosco! 😍❤
ReplyDeleteObrigado por ler, Joy! ❤
DeleteExcelente el tutorial y me gustaría hacer una pregunta ¿está puntada se puede elaborar con un hilo un poco más grueso.gracias.
ReplyDeleteit can be made with thicker thread but it won't look as smooth!
DeleteHola Amina he leído tu post y me surge una pregunta, ¿Puedo usar un hilo de coser?
ReplyDeleteIt would be difficult to split the sewing thread!
Deletereally helpful, Thanks
ReplyDeletethanks for this very interesting lesson can you tell me the length of a long point and a short point
ReplyDeleteMy long stitches can go up to 7mm, the shorter ones would be around 4-5mm
DeleteOlá sou do Brasil e achei tudo muito bem explicado, sou iniciante e fiquei muito feliz por compreender. Acredito que vou melhorar com seus ensinamentos. Obrigada
ReplyDeleteHi Amina! Do you split your thread for this stitch?
ReplyDeleteThis is a really informative article for people who want to develop embroidery skill completely appreciated your blog.
ReplyDelete