Nowadays, as I noticed,
the most popular line stitch is the back stitch. Which is
wonderful, because this stitch is very handy and easy to “tame”.
But as for me, my all-time favorite line stitch is the stem stitch. I
just like how it looks, like the type of lines it draws and one more
thing that I appreciate in it – its versatile appearance.
For the back stitch, the
two following factors will decide on how it will look: the thickness
of thread in the needle and the length of stitches. By adjusting
these two aspects, your back stitch line might be wider and thicker
or, on the contrary, be slender and fine.
Stem stitch, however, is
different – apart from the length of stitches and thickness of
thread, the other thing that decides its look is the place of the
C point.
Now, what is the C point?
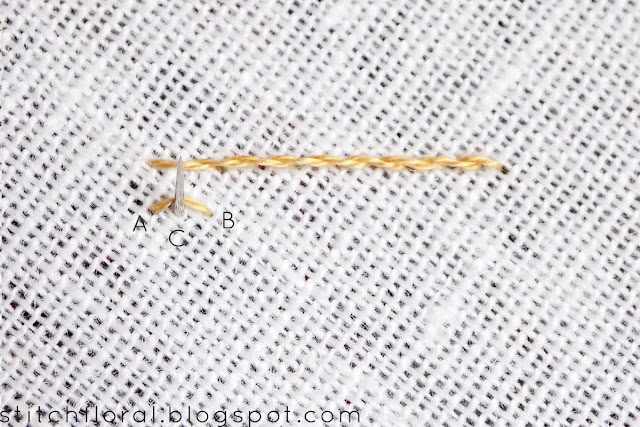
You know, how they make the diagrams for stitches marking the points
with A, B, C etc. For the stem stitch, it means: A point – the
start of the first stitch, B point – the end of the first stitch, C
point – the start of the second stitch. The C point is normally
situated somewhere between the points A and B. This vague
somewhere is what varies from stitcher to stitcher and is,
what I believe, worth exploring a little further.
Rope VS Liana
This difference is the
most important to understand when you learn stem stitching!
The “rope” and “liana”
is my own way of classifying these two looks, but there is another
one: some stitchers refer only to the ropy looking one as “stem
stitch” and the other one as “outline stitch”. You will meet it in some stitches dictionaries, but they're in minority from what I noticed... As I am a fan of
making things easier, I don't really divide them as different
stitches, but as two different looks of one stitch. But you can use
the “stem stitch VS outline stitch” classification if you like it
more!
As I mentioned earlier,
the difference in these two appearances of stem stitch is the place
of the C point. Or rather, in this case, the direction in which the
needle comes out from under the previous stitch.
When you bring the needle
up through the fabric above the thread of the previous stitch – it
makes your stem stitch resemble a rope.
However, if your needle
comes up below the previous stitch, then the line will look smoother
and will grant it what I call a “liana” look.
Please note, that both
times the C point lies technically in the same place – right in the
middle between the A and B points, on one line with them. What makes
the difference is only the direction in which you bring the needle
up.
And now a bit of theory:
The difference in the looks is explained by the
twist of the cotton floss thread – you might notice that one strand
of floss consists of two fine fibers twisted together. So,
the cotton strand already has a twist to it - “S” twist (some other
threads have “Z” twist). So when you work the stem stitch the
first way – one twist adds to another one and creates a more
dimensional look. When you work the stem stitch the second way, it
straightens the twist and makes the line seem smoother. You can read
more about it in the Bullion stitch crash course.
Anyway, if this
information seems a bit too overwhelming for you right now, then
here's the main point: be mindful of where you bring up your needle
up when you start the new stitch – above or below the previous one
– it will decide on whether your stitch will look ropy or smooth.
I already mentioned it the post with stem stitch basics. Although there I worked
the line from the right to the left, so the principle worked the
other way: if the needle comes up from below the previous stitch, the
line will have a “rope” look, and if the needle comes up from
above the previous stitch, the line looks more solid.
And that's the thing one
should also be aware of when stem stitching: whenever you change the
direction of working the stem stitch line, the rule also changes
otherwise. I wrote about it in the post about changing directionof stem stitch. And here's a
picture that might serve as a better reference:
Working
a rectangle will help you to understand this rule better :)
Broad stem stitch
For
the previous two looks the C point must be situated on the same line
with the A and B points. But what if we move it higher or lower?
This
will make your stem stitch a bit broader.
Technically
it will be a line of slanted parallel stitches. If the C point is
still close to the AB line, as in the pictures above, then the line
will still resemble a rope. But the further the C point is, the more
it will lose this resemblance.
This
way of stem stitch fits perfectly for working the lines and slight
curves, but the tighter the curve the more difficult it will be to
make it look neat because of the “spikes” that will appear.
Thin stem stitch
Now,
what if the C point is on the same line with the A and B points, but
not in the middle? What if we move it closer to the end of the
previous stitch (the B point)?
It
might be clearer using the “hand sewing” method of
embroidering:
So,
with your needle you grab only a little bit of fabric, while making
the stitches themselves pretty long.
This will result in your line
looking very fine and, may I say, resembling the back stitch a
little? I'd say it would definitely look better with more strands of
thread in the needle. Again, working tight curves and corners in this
way of stem stitching could be problematic.
Personal insight
In the picture above you can see the 6 face sof stem stitch:
- "Ropy" stem stitch
- "Liana" stem stitch (outline stitch)
- Broad stem stitch with the C point situated above the AB line
- Broad stem stitch with the C point below the AB line (and shorter stitches)
- Thin stem stitch with the needle coming up from above the previous stitch
- Think stem stitch with the enedle coming up from below the previous stitch
For
my part, I guess will always stay loyal to the first two looks of the
stem stitch. With my favorite being is the second one :) I just like the smooth and solid look of these lines.
I never use the other four, but I believe that it is
always a nice idea to explore the stitches deeper. The more you know
about the techniques, the more experience and practice you have, the
more comfortable you will feel with the needle and thread. And who
knows, maybe you are struggling with one type of stem stitch, while
the other one fits you and your style much better?
So
try it out and let me know which one you like more!


Thank you for this tutorial. I'm a beginner embroiderer and am still trying to figure out why my stem stitching sometimes looks different. Your explanation of the thread twist was just what I was looking for. I'm very happy to have found your site.
ReplyDeleteIt can be really confusing at times! Thank you for reading :)
ReplyDeleteThank you, I just thought about the same varieties of stem stitch as you do, because I explored my beloved stitch, especially on the back side. It's very interesting to look on the backside of your embroidery an to examinate the connection between both sides.
ReplyDelete