Here's an alternative to
our good old stem stitch!
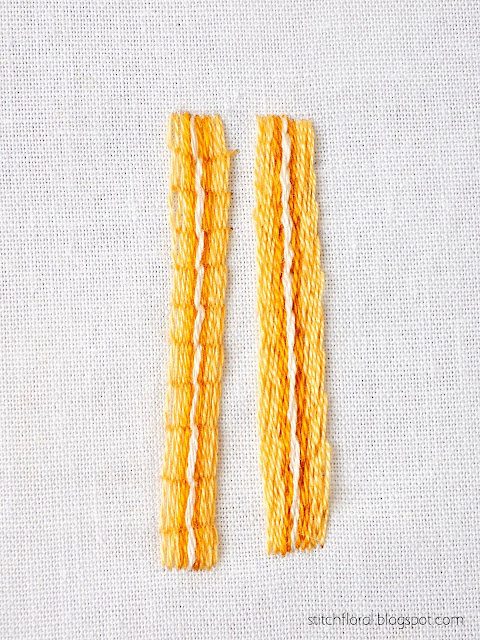
Take a look at the picture below.
One of these shapes is
worked in regular stem stitch and another one is worked in raised
stem stitch. I wonder if you can identify the one we are going to
learn today? :)
Don't cheat!
Okay, it is the left one.
I suppose you can already
draw some conclusions about how these two techniques are different,
just by looking at their comparison. We will stop on this matter
later and think of their pros and cons, but before that, let's see
how it's worked.
Raised stem stitch tutorial
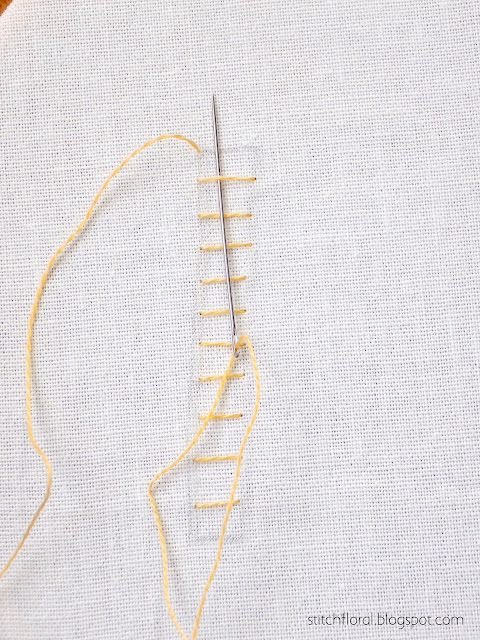
1. First of all, we need
foundation stitches. Think of the direction where you want your raised stem stitch move and make foundation stitches that would be perpendicular to it. So,
in this case, I was going to move in vertical direction so my
foundation stitches are horizontal. Does it make sense?
By the way, raised stem
stitch is usually worked in narrow shapes like this but it is also
curve-friendly. Think of tree trunks and letters' lines (Die van Niekerk!).
2. Now bring the needle
with working thread on top of the shape and slide the needle under
the closest foundation stitch in the direction of where you've just started.
I don't say “upwards”
on purpose, because you might be working this stitch in various
directions. So what you need to be mindful of, is that the needle
will move in the direction of where you started the stitch. In this
case, it will move in the upwards direction.
3. Then repeat the same
step with the next foundation stitch.
4. And keep going until
you reach the other side of the shape.
As you see, my thread
stands a little away from the side but that will be fixed with
each new row, as they will be naturally nudging the outermost one to
scoot over :)
5. When you reach one side
of the shape, you can go back all the way to the other side and start
a new row from the same side. As for me, I prefer to just go in the
other direction now, mirroring my movements.
So, in this case, I
started the second row from the bottom, and I slid my needle under
each foundation stitch with its tip looking downwards.
IMPORTANT: If you decide
to do it like me and switch directions, make sure you also keep your
working thread on the opposite side. Mirror your actions. If you look
closely at the pictures of the first row, you can see that I always
left the working end of the thread on the left of the needle. Now as I'm
moving upwards, I keep the working end of the thread on the right side.
If you don't mirror that,
the rows will look slightly different!
If all of this confuses
you, then for every next row just come back to the same side of the
shape :)
6. So here are four rows
of the same color. You can see that the first one already scooted
over a bit.
7. And here is the fully
finished one.
My shape is not ideal, it
is a little quirky, so some foundation stitches still stick out.
Well, if you find yourself using raised stem stitch for curvy or wavy
lines that narrow down/widen up – just know you can always add a couple of extra rows and simply make them shorter.
PROS, CONS, TIPS
If we think about the
pros of raised stem stitch, the most important, in my mind, is
how orderly and structured it is. You see, even though my shape
wasn't very even, and my foundation stitches were worked just by eye
measuring, the final result still looks very neat!
On the other side, regular
stem stitch offers better coverage (in my mind) and more
versatility in the ways of applying it.
Lastly, raised stem stitch
is much faster to work and it doesn't consume much thread. Meanwhile, regular stem stitch is slower and more thread-demanding.
My personal opinion is
that raised stem stitch is a wonderful technique to take advantage
of, but the occasion for that may not come that often. Still, it's
worth learning so that you are ready and fully equipped when the time
comes! :)


Hola Amina! Me gusto esta técnica. Pero tengo varias preguntas: como te queda el trabajo si se te acaba la hebra de hilos en la mitad de la hilera? Deshaces esa fila para dar terminación por el revés para que quede prolijo? P simplemente das terminación ahí mismo y sigues con otra hebra?.
ReplyDeleteEspero que estén tu y la familia bien. Saludos desde Córdoba, Argentina
¡Hola, Fabiana!
DeleteMuchas gracias, estamos bien. ¡Espero que usted y su familia estén bien y saludables!
Cuando su hilo está terminando, hay dos opciones:
1. Observa que el hilo va a terminar, así que lo termina antes de comenzar la siguiente fila.
2. Si termina en el medio de la fila, termínelo encima la línea horizontal, según la dirección que esté siguiendo. Luego comienzas el nuevo hilo opuesto a donde lo terminaste.
Pero es mejor comenzar un nuevo hilo con una nueva fila.
Espero eso ayude :)
Muchas gracias Amina.
ReplyDeleteMuchas gracias Amina.
ReplyDelete