When deciding on the next project to stitch, I thought, why not post the full process so that anyone willing is able to join in the fun?
This comes out of the blue, I know. There's a lot on my plate right now, so I apologize for the lack of organization for this Stitch Along. However, I do hope that some of you will enjoy working it :)
So, here's the PDF with the pattern and thread chart.
(Upon a request, there is an alternative, warmer color palette for the flowers)
***
Before we start with instructions, I'd like to tell you that there is a chance for me to create a Comprehensive Hand Embroidery Course, where we could go in the depths of the stitching world! However, I do need to gather 200 interested people for that to happen!
Please, follow this page if you'd like to learn hand embroidery with me. It does not in any way obligate you to pay anything, it is only an expression of interest and a way for you to stay updated.
After the target number is achieved, the next step will be the survey where you can share what exactly you'd like to see in the course, and you'll also get a 25$ coupon for following and 5$ coupon in case you fill in the survey. After collecting your wishes from the survey, work on curriculum and production starts. Unfortunately, until then I can't tell the exact price of the course, since it will heavily depend on the number of lessons and projects. However, generally, courses like that are priced ~150-200$ on the platform.
Thank you, everyone who already followed the page! I really hope we can have fun together and stitch something extra pretty during that course :)
***
Okay, now let's start our Stitch Along!!
I suggest starting with the easier area on the top.
1,2) Take 1 strand of thread I and stitch the 3 stems. I'm using outline stitch – it is the same as stem stitch except the needle emerges on the right hand of the stitching line. Here are some useful links to check out: Stem stitch crash course, 6 faces of stem stitch
3) With two strands of thread, start placing lazy daisy stitches along the stems. I used 3 colors: I, J, K. You can vary the placement of colors however you like, although I would suggest keeping the lightest color on the top and the darkest at the bottom. The middle can be shared between J and K.
4) Fill the loops of lazy daisy stitches with one straight stitch of the corresponding color. That will make them solid in color.
This part is finished! We're going well.
Now let's work the smallest flower.
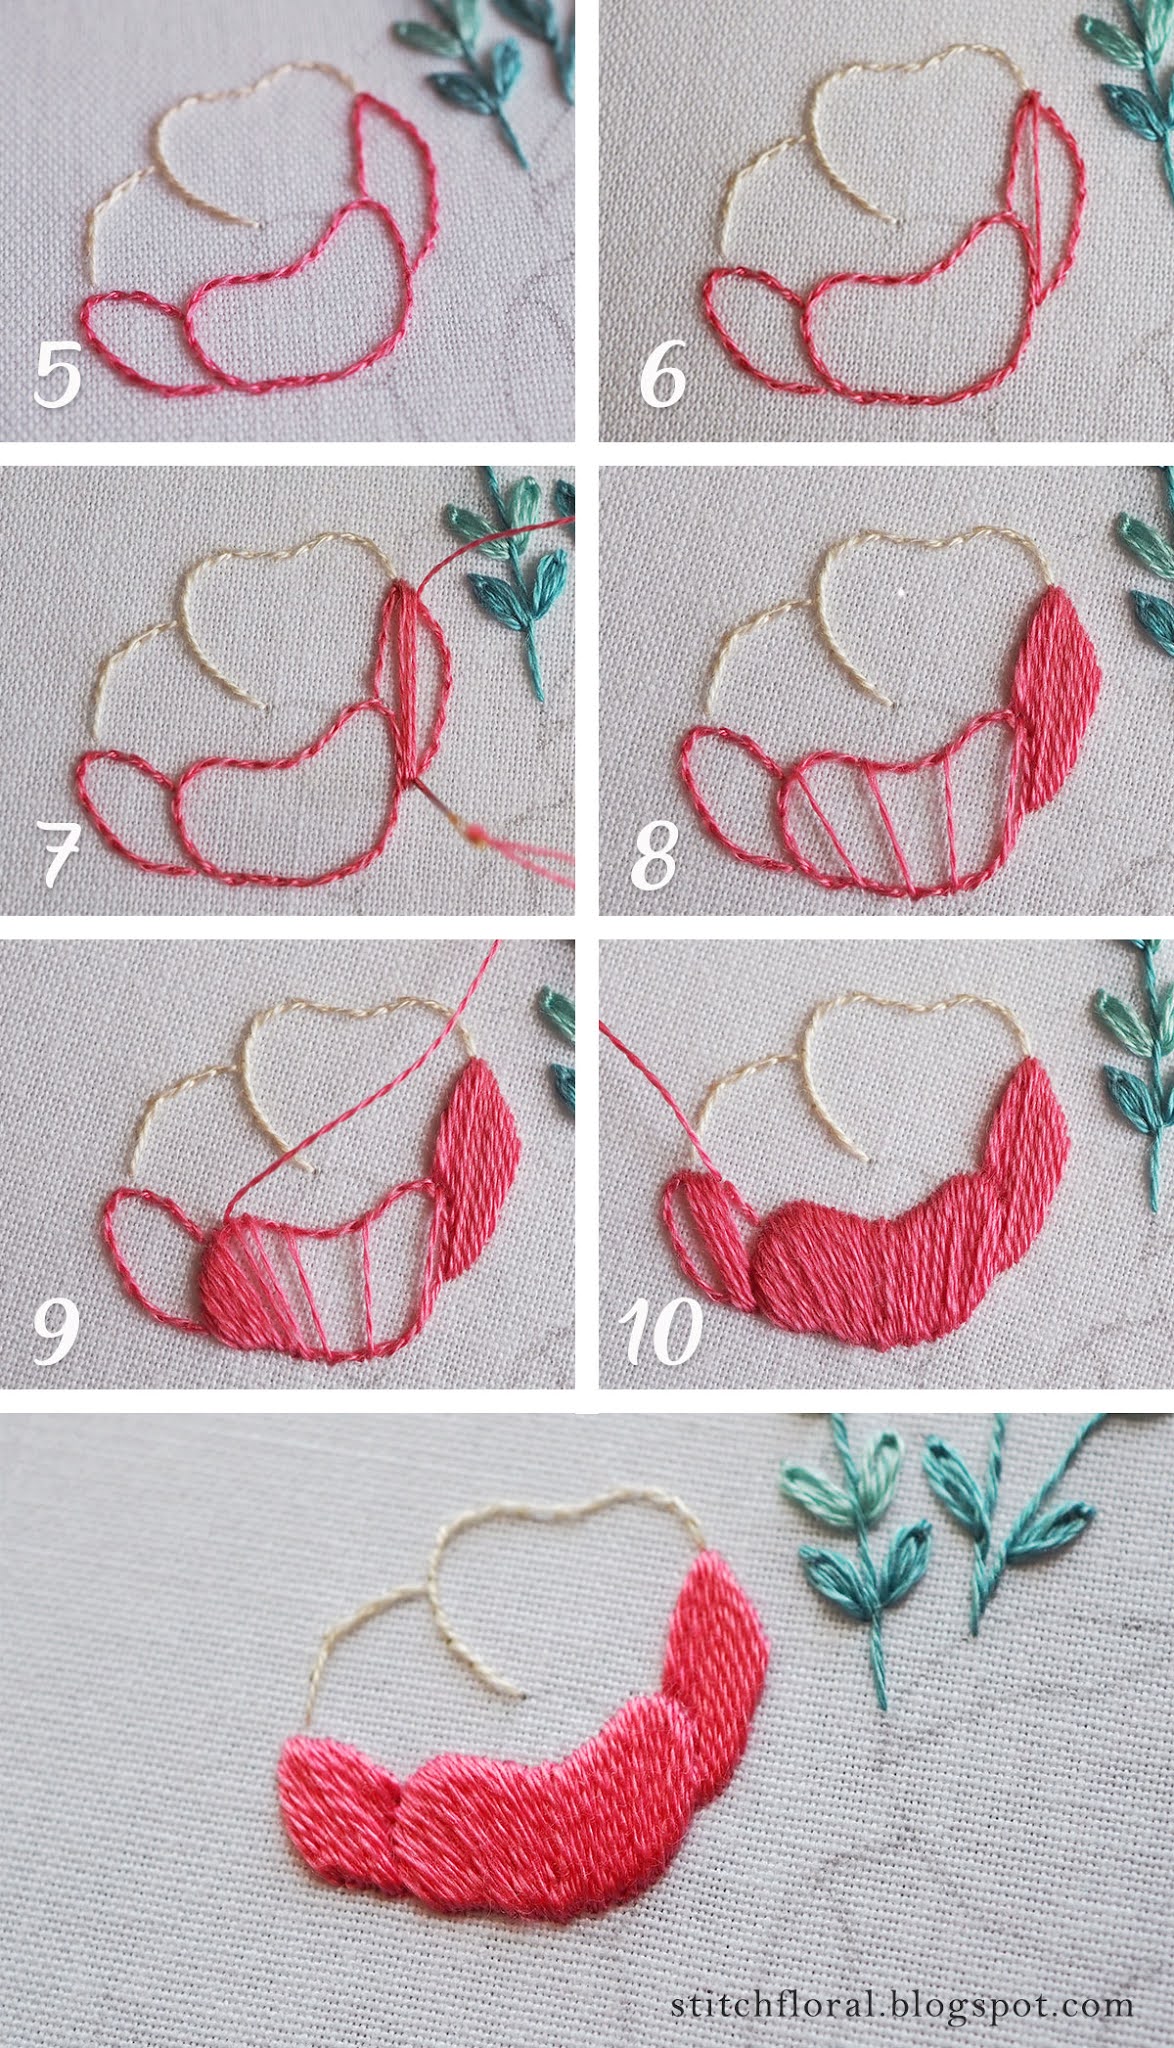
5) Outline the petals using thread A for the background petals and E for the foreground petals. I used split stitch in 1 strand of thread for most of the outline, except for one place: where one of the petals at the back overlays on the other. If you look closely, you'll see it is worked with an outline stitch.
That will make it easier later to fill in the petal, as we will not have to place stitches over this edge, instead, we will place stitches parallel to it, so that they merge.
6) First, let's deal with the petals at the front. Take one strand of thread E and let's do some satin stitching. Place the first straight stitch approximately in the middle of the rightmost petal.
7) Then start placing parallel stitches on one of the sides. After you finish one of the sides, go the other until the whole petal is covered.
8) The middle petal will need to be covered with a slight variety in direction, so place few guiding stitches like rays – with increased distance at the top.
9) Then start filling the shape from one of the sides. Pay closer attention to the bottom of the shape and make sure stitches are close to each other there. On the top, if you see some gaps, fill them with half-length stitches not reaching the bottom (tell me if you're confused about that part).
10) With the leftmost petal, repeat steps 6 and 7.
Petals at the back.
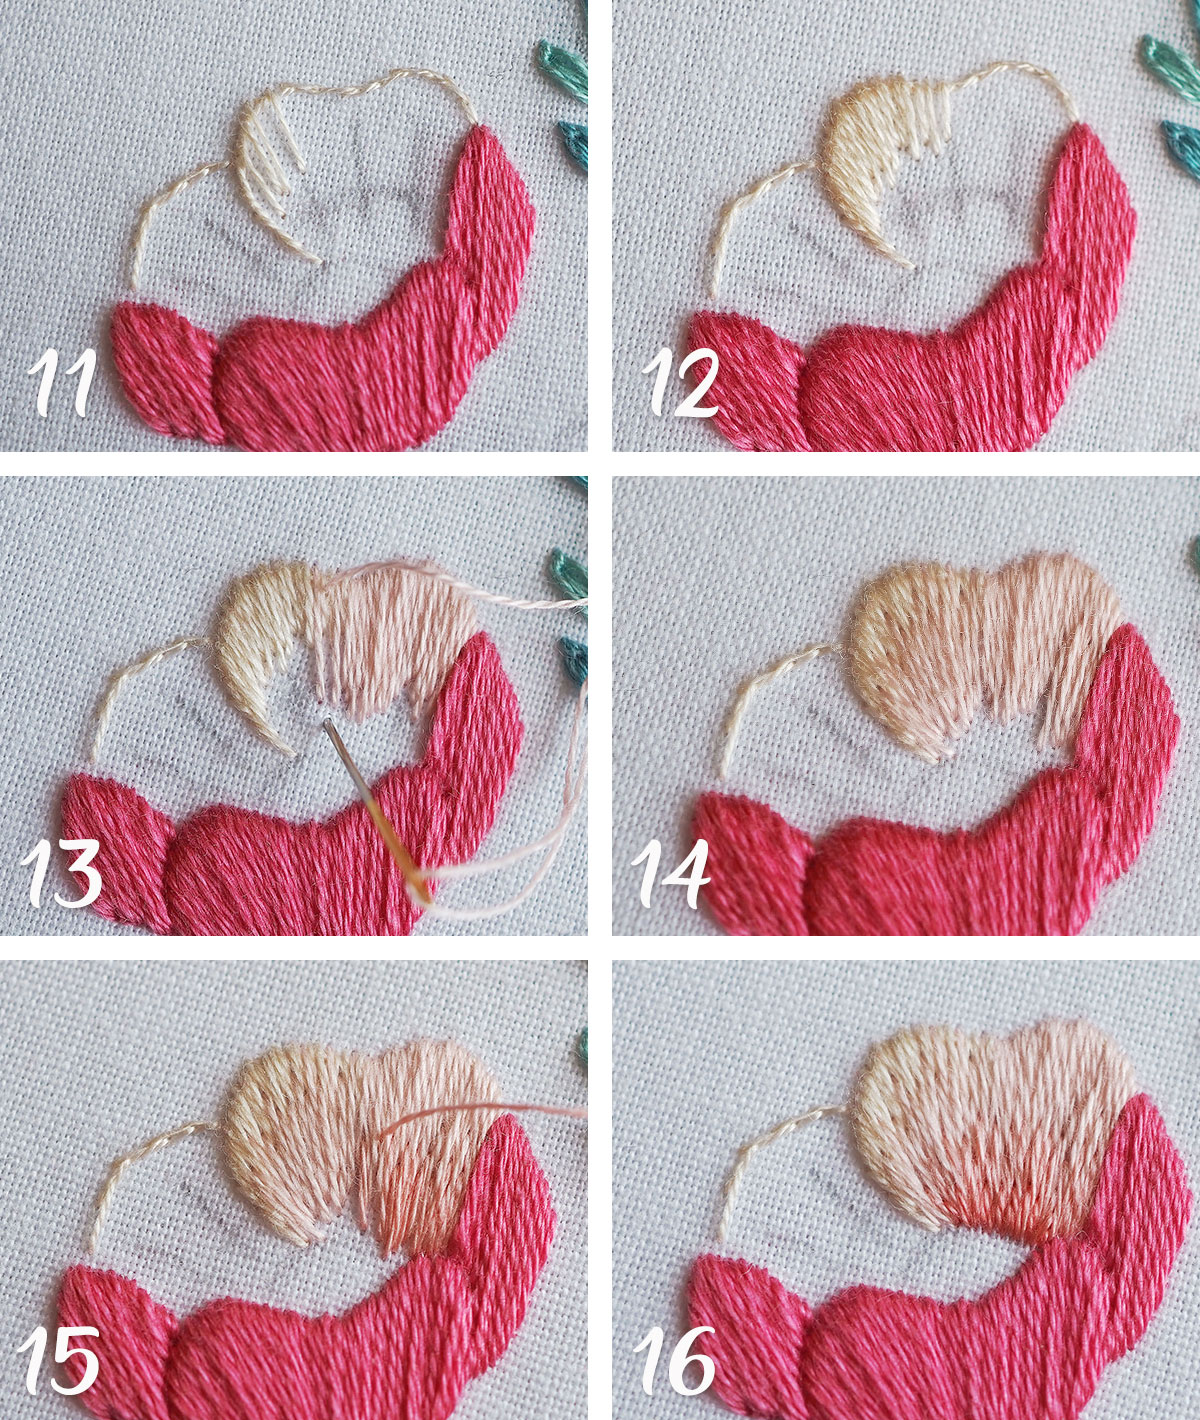
11) Long and short stitching alert :) Here is the Guide if you're new to this technique. Let's start with 1 strand of color A, placing some stitches on the left upper corner of the petal.
12) As you see, I didn't go over the edge on the left, instead, I placed my stitches parallel to it.
13, 14) Fill the rest 2/3 of the petal with color B.
15) Add a row of C.
16) Finish the petal at the bottom with a row of D.
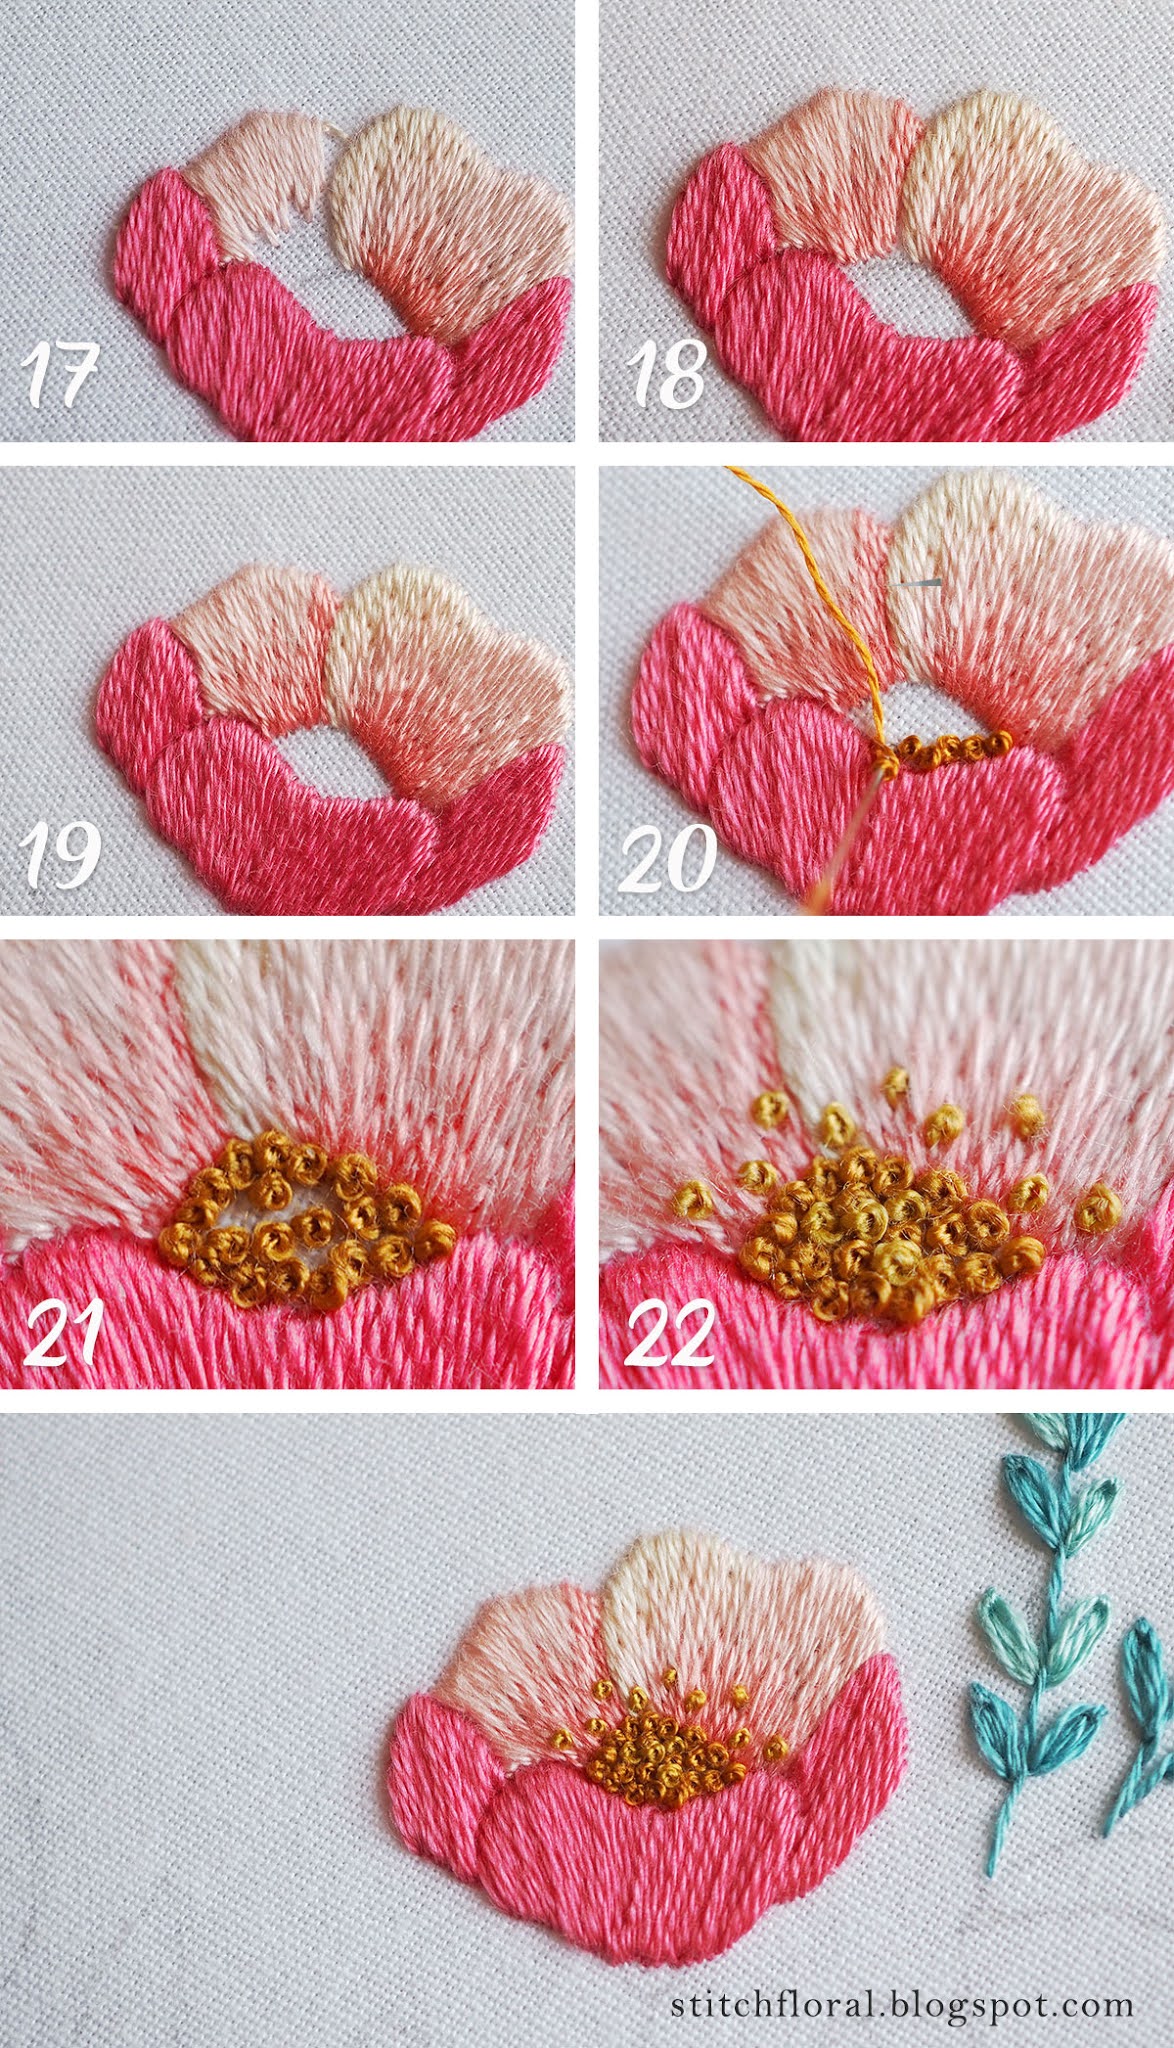
17) As for the petal on the left, we start with thread B on the top. This row finishes in some distance from the petal on the right, to give space for the other color.
18) With color C we fill practically the rest of the petal, leaving some space at the bottom for the last row and enough space on the right for just a couple of stitches in the next color.
19) With color D, we finish the petal at the bottom and add a couple of stitches right next to the petal on the right, to separate them from each other a little more.
20) Take 1 strand of thread F and start making French knots at the center.
21) Use 2 wraps around the needle and work these knots along the edge of the center and add some in the middle.
22) With 1 strand of thread G, fill the rest of the center, and add 1-wrap French knots directly on the petals.
Stems and buds.
23) The flower's receptacle is worked in 1 strand of thread H, by starting stitches along the upper side and ending them all at one point at the bottom. Then we work the stem, I used outline stitch again.
24) For the bud, it is not really necessary to work the outline in green, that was just more convenient for me. You do you! :) Work the upper part fully in thread B. Since the are is small, it easier to add other colors on top of the main one rather than work it the usual long and short stitching way.
25) Add colors D and E right on top of the previous stitching. Vary the length of your stitches for the colors to blend better.
26) Then, fill the bottom part of the bud with thread H, starting the stitches by splitting the ones above. Don't be afraid of the “ragged” edge, that's actually the goal.
27) Work half of the bud stem in H using outline stitch, then starting from the bottom work the rest of the stem in thread I, joining the two parts by finishing the stitch under the last H one. It creates a fun “ombre” effect.
28) Lastly, work a little twig on the left side of the stem in I thread, and add a French knot, using two strands of color E and 2 wraps around the needle.
The end of Part 1! Leave your questions in the comments below :)


Thank you for sharing this gorgeous project and for documenting each step with such care. I can’t wait to get started.
ReplyDeleteThank you, Elizabeth!
DeleteThank you so much for the May Blossoms Stitch Along. I will totally enjoy "stitching with you".
ReplyDeleteLooking forward to seeing your works! :)
DeleteHola Amina!!! me encanto este nuevo proyecto! gracias por compartir tus conocimientos con nosotras.!!! Cariños desde Cordoba, Argentina.
ReplyDelete¡Hola, Fabiana! Gracias por gustarle. ¡Abrazos a Córdoba!
DeleteThank you! I can't wait to get started on this beautiful pattern. Having your great instruction is fabulous.
ReplyDeleteThank you, Diane :)
Deletejust beautiful. so simple and elegant. thank you.
ReplyDeleteThank you for enjoying it :)
DeleteYour handwork is so lovely and an inspiration. Thank you.
ReplyDeleteThank you!!!
DeleteThank you for this stitch along! I'm wondering what the actual size should be for the pattern. When I print it, it seems very small.
ReplyDeleteHi, Tina! The size should be around 8 cm in width, 20cm in height (3.1" X 7.8"). Unfortunately I can't print right now to check precisely, because my printer is out of service, and we are in a quarantine lockdown here in Turkey so I can't go out
DeleteThank you! Can't wait to get started!
DeleteCan I give you a shoutout on my Wattpad account?
ReplyDeleteHi! Sure, I don't see a problem :)
DeleteAlso, what material do you use?
DeleteI use quilting cotton for the ground fabric.
DeleteAlternatively, you can use cotton twill, linen, muslin, calico. If the fabric is too sheer, it is better to strengthen it either with one more layer of fabric or with a fusible material.
The month of May has passed but im so excited to do this stitch along as your work is absolutely beautiful and I cant wait to learn how to stitch blossoms/flowers!
ReplyDeleteWell, the article is well worth to read. she has such a great taste in Flower.
ReplyDeleteThanks
custom engagement rings adelaide
ReplyDeleteThanks for sharing wonderful Information. In this article I learn a lot. And if you want to know m about wedding or matrimonial services visit:- Truelymarry
One of the best Indian matrimonial site in Kanpur TruelyMarry
We provide services:-Kanpur , Manglik , Second Marriage