Stitch series is having a much-needed comeback! Today we will talk about split back stitch, which is basically another way of working split stitch. If you're following the Needle Painting stitch along, this is all the more reason why you should be buddies with this stitch. But no worries, it's quite simple so you will get a hang of it quickly!
First of all, what you should be aware of, is that some stitchers actually call it simply “split stitch”. Because, well, it is, in fact, split stitch, but is worked differently than a conventional one.
That's probably the reason why there exists a confusion in translating some books and articles, like what I experienced with Trish Burr's Miniature Needle Painting Embroidery: although the stitch lexicon calls it simply “split stitch”, the images demonstrate the steps of working split back stitch. I talked about it in Part 1 of the Needle Painting stitch along.
So, are split stitch and split back stitch two different stitches? I guess everyone is entitled to their own opinion on this matter. As for me, I consider it as two different ways of working the same stitch.
It sort of reminds the stem stitch dilemma where you also can achieve a different look by changing the side where the needle comes from under the previous stitch.
Strangely enough, I'm used to calling it stem stitch regardless of the way it is worked – I never use the term “outline stitch”. Instead, I refer to them as a “rope” and “liana” looking, as you can read in the post about 6 faces of stem stitch. However, when it comes to split stitch, for some reason I prefer to call them differently – split stitch and split back stitch. Yeah, strange, but so it works for me.
How to split back stitch
The steps are very easy, but before we start you might want to check out the split stitch lesson and back stitch lessons to understand the difference better.
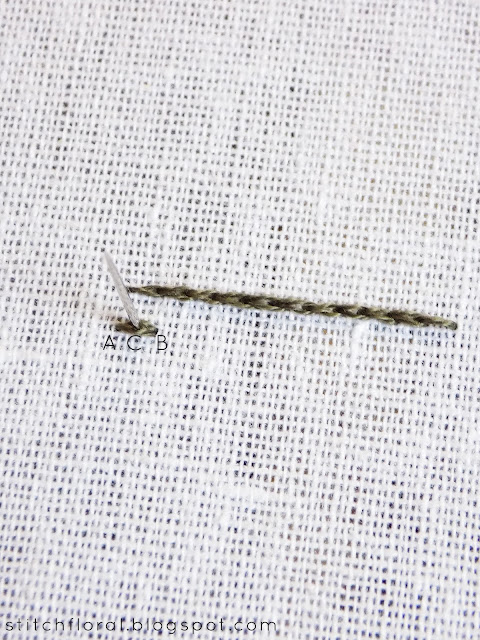
Make a straight stitch (from A to B) and then bring the needle up at a distance from it (point C in the picture above). Then take a step back and insert the needle, splitting the previous stitch. At this point, it's up to you whether to split it in the middle of the stitch or closer to the B point.
Continue repeating these steps as you are working a line.
Here's how it will look like.
It looks like a chain and is almost identical to split stitch. Almost.
If you work a line of split stitch beside it...
and compare them, you will notice a slight difference. To be exact, split stitch has more volume and texture and looks thicker and sturdier. While split back stitch lies flatter on the fabric.
Split back stitch also “eats” more thread because of the constant stepping back and forth. It comes very clear once you look at the back of the fabric.
Functionality
Just like the split stitch, split back stitch will fit the purpose of embroidering lines and filling in the elements and areas of a design.
Actually, I never really used split back stitch until I started the Needle Painting stitch along and followed Trish Burr's guidance. To my surprise, split back stitch turned out to be indeed much more convenient in embroidering fine curves as it is more lenient in this regard.
Nevertheless, as a filling I would stick with the more raised and textured split stitch.
How about you? Which one do you prefer to use: split stitch or split back stitch? Do you see them as two different stitches or the two ways of working one stitch?


No comments
Write what you think! ❤
Note: Only a member of this blog may post a comment.