November is coming to an end, so it's time for a lil freebie to make this month a bit more exciting ^^. This time it's the Grace embroidery design that you might already be familiar with from my previous posts. I'm excited to share not only the pattern and stitches I used but also a bit of guidance and tips. Hopefully, it will make the stitching process easier for you!
This design features 3 key elements:
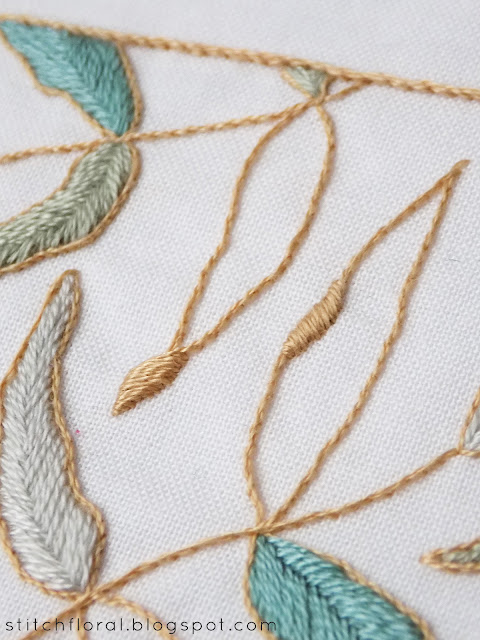
- Rope-looking lines and outlines for the leaves
- Filling of the leaves
- Lettering
Lines
All of the lines are worked in stem stitch. You can see some additional tips on stem stitch in the following posts: Changing direction of stem stitch and the 6 faces of stem stitch.
Long story short, as you are stem stitching, keep bringing your needle up to the left of your stitches. This will help you achieve the “rope” appearance of your stem stitch.
Given that the direction of lines keeps changing throughout the whole pattern, be careful to not mix up the sides of where the needle should come up. If you are confused, rotate the hoop or embroidery frame so that the line faces upwards and make sure the needle comes up to the left of the line.
When I stitched I worked the outline in portions. Let's say I completed 25% of outline first, then filled in some of the leaves, then worked the next 25% of outline and so forth. It helped me to keep a steady path.
But, of course, it might be more convenient for you to work it in another way. Maybe you'd like to complete all of the outlines first and only then fill in the leaves. It's completely fine! Decide for yourself the order of working this embroidery pattern and work it in the way that makes you comfortable!
I used two strands of floss for the box around the word GRACE, and one strand of floss for the rest of the lines. It made the plant motif look finer and helped the box to stand out.
Leaves
All of the leaves are filled with the fishbone stitch after the outline is already complete. The leaves are not always conveniently “straight” and with even edges. Their form changes here and there and sometimes they are not complete or cross with other leaves.
So, yes, although the fishbone stitch itself is quite easy to pick up on, this design might still present a challenge. As a result, it will be an excellent practice of fishbone stitch for you ;)
The order of working the leaves can be whatever you want. Just like with outlining I did it in portions, but it is possible to fill all the leaves with one shade of floss first, and then another and so on.
I used two strands of floss when I embroidered the leaves in this pattern.
Also, in some places leaves “fold”. These small areas are worked by satin stitch using one strand of floss in the needle. I didn't do any padding here. Just stitched the outline the same way as the areas of the plant motif and covered the “foldings” with parallel satin stitches.
Lettering
I used an easy and quick approach to lettering for this design. Take two strands of floss and outline a letter in back stitch first. Then “wrap” the letters in satin stitch.
Because the letters are not that big and we use two strands of floss, there is no need for any padding. The letters look dimensional enough and pop out of the fabric surface.
That's pretty much it. In case you have any questions left, you're always welcome to leave them in the comments below or send me a DM through the contact form :)
Have a nice stitching!


This is absolutely beautiful! Tge colors are so perfect for this piece! Thank you for sharing your talent!
ReplyDeleteGood work with golden thread. Like it
ReplyDeleteThanks, Eliza :)
DeleteBeautiful! What type of pencil did you use for the name? Thank you! ��
ReplyDeleteIt is water erasable marker!
DeleteIt´s so Beautiful,
ReplyDeleteThank you for shared the free pattern
Jany
My pleasure :)
Delete¿Cual es el tipo de letra q has usado para el nombre?Gracias
ReplyDeleteI'm sorry, it is an old pattern, I don't remember!
DeleteWhat type of thread did you use? I just started to hand embroidery a few weeks ago and I bought DMC thread. Your thread looks thicker. Thank you for sharing/teaching about hand embroidery. I have learned a lot from you.
ReplyDeleteHi! It is DMC, 1 strand of thread for the leaves motif, and 2 strands for letters :)
DeleteHi! Beautiful piece. Do you remember the colour chart number of each thread? they are so nicely selected
ReplyDeleteHi! If you donwload the pattern, you will see the thread chart there :)
DeleteThat is really nice to hear. thank you for the update and good luck. custom made velcro patches
ReplyDeleteThis comment has been removed by the author.
ReplyDeleteThanks for a very interesting blog. What else may I get that kind of info written in such a perfect approach? I’ve a undertaking that I am simply now operating on, and I have been at the look out for such info. Intian viisumi
ReplyDelete