There are two essential things a beginning embroiderer should learn first-hand: how to begin and end embroidery stitches.
Why ending embroidery thread is important to do in the correct way
The backside of hand embroidery is, in general, a matter that should be taken seriously. This is where we secure our thread in the beginning and end of our projects, so for the work to withstand the test of time, to not get disarranged and for stitches to not come loose, we need to ensure that the stitches are secured properly. Hand embroidery is hard work, we put a lot of effort and emotions into our projects, that's why it's better to pay special attention to the backside.
At the same time, we need to take into account if our backside is proper enough for any finishing work you might be planning to do: mounting, framing your embroidery or using it as an embellishment for garments/accessories. Will the dark threads show through the fine fabric? Will there be any bumps when you mount your piece? Even the most beautiful embroidery can actually be spoiled by messy backside.
The two scenarios
Let's take a look at two most common situations when you need to finish your thread. The first one would be finishing thread on a line or few stitches situated quote closely. The second situation would be when there is a whole area filled with long & short stitch or satin stitch.
Ending embroidery stitches on a line
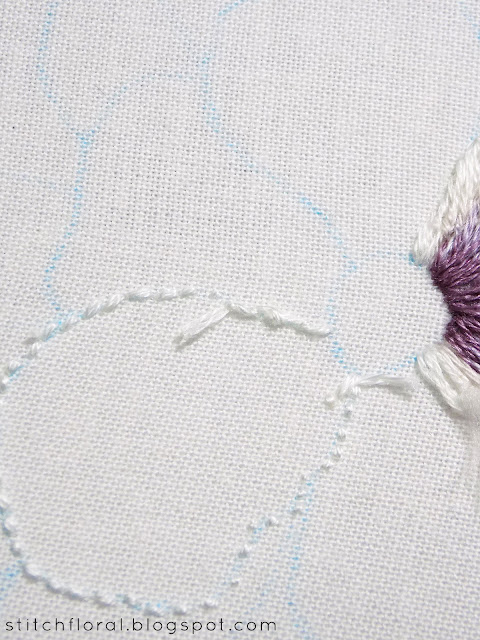
I say a "line" specifically because that's what I'm showing in the example. But it would work the same way if there are several stitches around that you can "grab on to" to secure the thread.
Slide the needle under a couple of stitches in close proximity of where you finished your stitching.
During one of these sliding moves, don't pull the thread fully, instead leave a little loop so that you can bring your needle through it.
Pull the thread gently to form a neat knot.
Now slide the needle under a couple more stitches to secure it better and snip the thread.
Ending thread in a covered area
This method works for satin stitch and long and short stitch. Below I will explain why I find this method more fitting for such situations, and for now, let's see how it works.
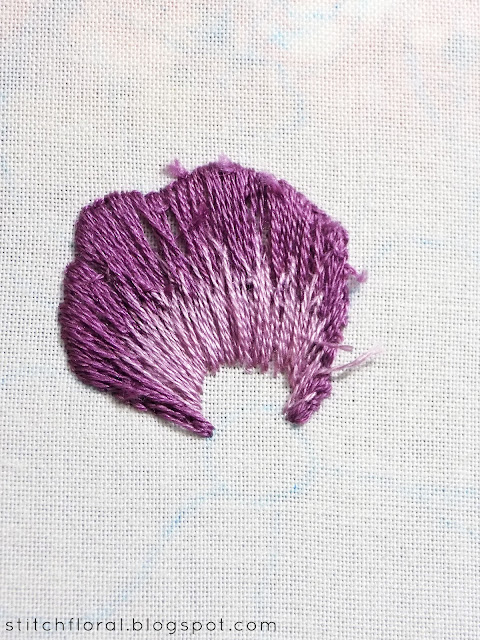
Make your last stitch and then slide the needle under the layer of previously laid ones. I prefer being quite generous in how far I go, haha, but you don't really have to do the same. If you go halfway of what I show in the picture above, it will still be enough.
Next, make the same move but in the opposite direction, burying your thread under the stitches again. Note that the places where the thread emerged from under the stitches and where I'm sliding it again are a little apart.
Now you can snip the thread. As you see, it's not very noticeable how you finished the thread here. Only the tails peek through, you can trim them off later completely.
To be honest, I've never encountered this way of ending thread in any books, articles, lessons. It is just something I came up with myself after practicing surface embroidery for a few years. Maybe someone else does it? Share in the comments if this method is familiar to you.
Anyway, why I think this method is more fitting said situations... It's because when we work long & short stitch and satin stitch, the stitches are usually a bit longer, placed very carefully and they are vulnerable to any extra tugging from the backside. When you make a knot you can accidentally pull on the stitches or disarrange them... In general, I just found it not very convenient. That's why I finish thread like this now :)
Remember these tips:
- Finish your embroidery thread in time. Don't wait until the working thread tail gets too short, trying to squeeze as many stitches as possible out if it. Leave at least 4 inches (~10 cm) left – or any other length that allows you to manipulate thread and the needle FREELY. You don't need to feel sorry for the thread and try to save it, because it actually wears down after you pull it through the fabric many times, so the part which you cut off is already not that fresh - it's fine to say “bye-bye”.
- Neat backside doesn't only mean no bumps and big knots, but also no thread showing through the fabric. The finer your fabric is, the more careful you need to be on this matter. It also includes the little tails from when you finish the thread. In the last pictures, you can see several tails peeking out of an embroidered area. Because the color is dark, they would be likely to be seen through the fabric. I usually trim them only after washing and ironing though, because sometimes their memorized position can change after that. But if they still peek out, then they will get trimmed.
- There's no need to paint peculiar patterns by weaving your thread under multiple stitches, zigzagging here and there, making loops etc. To be honest, I was once like that but later realized that these are only wasted efforts. You need only a few weaving moves to secure your thread properly. Any extra zigzagging across the backside and other movements might actually distort your stitching.
- Don't pull your thread too tight when you run it under the stitches. The stitches must sit on top of the fabric comfortably and cozy, so check the tension of thread to prevent puckering. But also don't make your thread too loose – it will make the last stitch in your project become ungainly.
The more you stitch, the more you master the art of finishing thread. Try different ways in various situations and you will find what clicks with you better, maybe you will even find your own ways of securing thread. Practice, practice, practice :)


I have a question. Does it matter whether you tie off or weave in thread ends if you are making a hand embroidered project that will be used and washed multiple times? I am embroidering dish towels after taking a 20-year break from embroidery and I am just learning about the weaving-in method now. Will weaving ends in hold up through the usage a dishcloth endures?
ReplyDeleteWeaving should be fine! You can weave in two directions like in the pictures and that's pretty much enough. Tying the ends.. well, it depends. The knot is usually safe enough, but the question is where are the two ends situated. Like, if you left one end on one side of the element and the other on the other side, tying them off could result in puckering. If they are beside each other, then that's fine!
DeleteIf I am embroidering lines which are separated, should I end and restart threads so that there is no trail of threads between the lines at the back of the fabric? The same question could be relevant for lots of little French knots.
ReplyDeleteIe would the ‘tails’ show through?
If the lines are not situated right next to each other, then I think it is better to end and start your thread over with each new element, despite how tedious it may seem. As for the French knots, if they are scattered in one area close to each other, I would just work them all together in one go. If they are situated more individually in a distance from each other, I would suggest ending and starting thread over for each one. Unless there is some previous stitching done in between them - then you can work one knot, slide your needle under a couple of previous stitches making your way to another one, work this knot, and so on.
DeleteHope that helps :)
Should you end and restart where there are gaps between colours?
ReplyDeleteWell, depends on the distance between these spots. If the distance is big, sure, it's better to restart your thread. If the distance is moderate and there are some other stitches in ebtween, you can slide your needle under the previous stitches making your way to the new spot.
DeleteGenerally speaking, I'd say, avoid leaving trails of more than 1.5-2 cm long.