Hi there! I hope you are not tired of the new stitches yet? You are? Well, here's the last portion for this month, be strong!
If you missed few days here on StitchFloral, then we're currently doing a mini-marathon on chain stitch-based stitches. Learn the previous stitches here:
And of course, the basic chain stitch itself and the tips to make it better are also worth checking out.
Well, actually, today's stitches are not that resemblant of the basic chain stitch, and if I didn't know they belong to this family I probably wouldn't even guess... But yes, they consist of loops which require anchoring, just like in chain stitch case, so maybe that's the reason?
Also, at first I was going to show only cable stitch and knotted cable stitch, but because the latter has elements of coral stitch in it, I thought why not introduce it as well? Learning 3 stitches at one go, because they are in this or that way related to each other, that's what I call effective studying!
Now, let's start our studying session, shall we?
Cable chain stitch
Cable chain stitch allows you to work a line which looks like a cable chain quite literally. And I think it is amazing!
It is not that difficult to work, but you have to pay the extra bit of attention to the part of wrapping thread around the needle shaft. If you try working it and fail, the chances are it is because you wrap thread in the wrong direction.
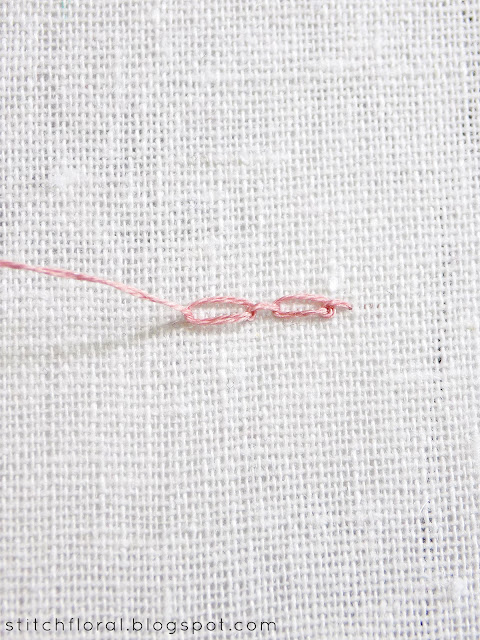
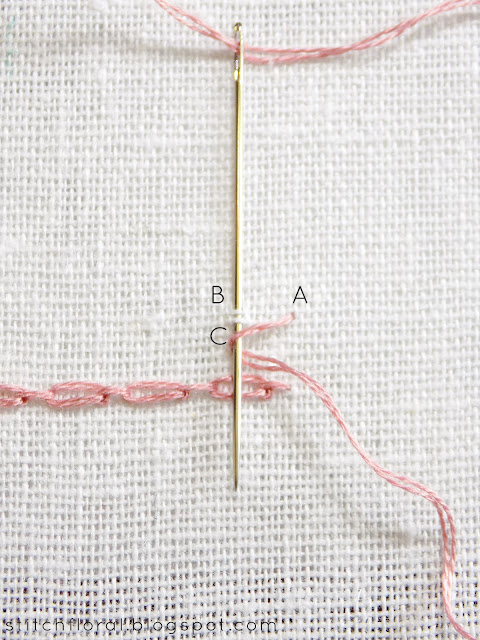
So, firstly, you come up to the front of the fabric at point A and wrap the thread around the needle shaft once. Only 1 wrap! The needle goes under the thread at first when you wrap it.
Next, insert the needle at point B which is further down the line, but still quite close to A. And bring the needle up at C, tucking the free end of thread under the needle.
Note, that BC is the length of the chain link, and AB – the length of “bridges” between them. You can notice a tiny knot at point B – it is created out of the thread wrapping around the needle.
Now, make another “bridge”, wrapping thread around the needle again...
...and inserting it a little further, coming out from the back of the fabric a stitch length away.
Now you have two cable chain links.
When you finish the line just anchor the last loop with a tiny straight stitch.
Coral stitch
This is a knotted line stitch which is VERY easy to work! I'm serious! If you ever saw the diagrams of coral stitch and thought that it is something too difficult for you, you're fooling yourself. I know, because I've been fooling myself for a long time this way!
So, bring the needle up through the fabric at the beginning of the line at point A. Then insert it at B and come out at C, with both of the points lying a stitch length away from A, opposite to each other, and slightly above and below the line.
If you're using an evenweaved fabric (cotton or linen) then you literally just need to insert the needle a hole up above the line and bring it up a hole below the line. If you're not using evenweaved fabric, then you'll have to work it by eye, but the distance between B and C should be really small if we want a neat knot.
Now, tuck the thread under the needle shaft from the left (from the right if you're working it in the opposite direction).
After you pull the needle through you will get a teeny tiny knot on your line. Continue working the line the same way.
Knotted cable chain stitch
Knotted cable chain stitch looks almost identical to the cable chain stitch and one might wonder why does this variation even exist? Well, it does and it just looks a bit more peculiar than the basic version and who knows, might be just your taste :)
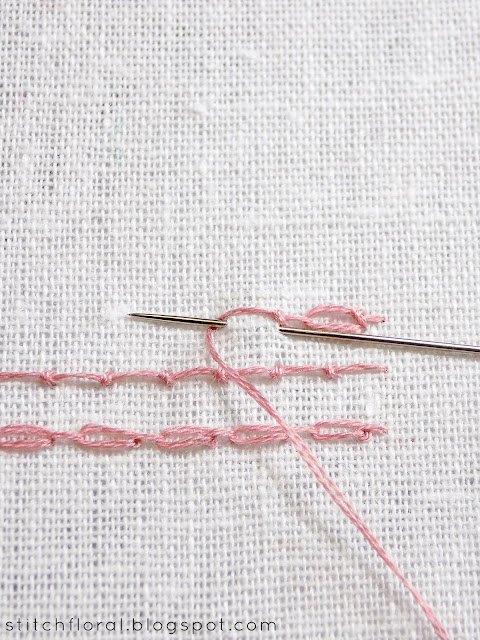
We start by making a “bridge” again (see the cable chain stitch instructions above), but this time we repeat the steps from the coral stitch technique. We bring the needle to the front of the fabric at A, then make a perpendicular tiny stitch further away and tuck the free end of thread under the needle shaft.
After we pull the needle through and get the knot, we insert the needle at C, which is the bottom point for the knot, and bring it up through the fabric at D – which is a chain link length away, tucking the free end of thread under the needle again.
Repeat the first step, making a tiny perpendicular stitch again and tucking the thread under the needle from the left.
And make another cable chain link.
Here are the 3 stitches we learned today.
A bit of my insight:
If I were to confess something strange I would say that the knotted cable chain stitch reminds me of small fish in a row and I have no idea why.😅 I mean the place where the knots are, they look like fish tales for me, haha. But you didn't hear that from me.
Anyway, cable chain stitch and knotted cable stitch look pretty much alike, don't they? The difference is only in the knots. In the basic cable chain stitch, the knots are tiny and hidden under the “bridges”, while in the knotted version they are proudly standing out in the surface.
In terms of working them, as for me, knotted chain stitch is a bit easier. Basic cable chain stitch might be more complicated when you try it the first time because of the wrapping thread – you need to do it in a certain direction to get it right. But of course, even if it doesn't work the first time, try a couple more times and you will get a handle on it! :)
So, all 3 of these stitches remind some kind of accessories, don't they? Coral stitched line looks like a beaded necklace, cable chain stitch is a literal representation of cable chain necklace, and the knotted cable chain stitch... looks like fish. 😅 I'm SORRY! I just can't unsee it. Anyway, I think it is a very fun stitch as well :)
Our little marathon came to an end, but only for this month. There are still many fun stitches based on chain stitch, but let's leave them for April. Hope you practice these stitches and they inspire you to something new and pretty!
Take care!


No comments
Write what you think! ❤
Note: Only a member of this blog may post a comment.