Hi, everyone!
I'm here with a new complete process! If you follow me on Instagram, you've probably already seen few sneak peeks. I also mentioned it on the blog before and said that I want to experiment a little. Well, I did! And at last, it is finished. So, catch some details and a new stitch tutorial.
As always, I didn't really bother to think of a name for this process, because it was just something for my own practice (if you have any ideas, though, please share). Hence, the ambiguous title of the post, sorry😐.
Anyway, shall we take a look at the details?
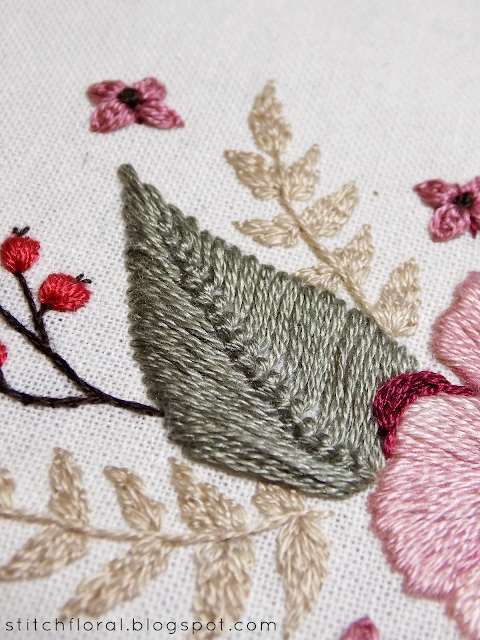
The leaves are worked using cretan stitch with 2 strands of DMC cotton floss.
I really like the fancy “spine” that runs through the center of the leaf thanks to the cretan stitch. Pictures don't give it justice – it looks quite dimensional and reminds of braids. Really pretty!
We haven't learned this stitch yet on the blog, but it is definitely on my list.
And there's also another type of foliage in the design – and here's where it gets a little interesting. Can you guess the stitch which I used here?
I wonder if it is as indistinct as I think or it is just my biased vision, haha. This is actually the “experiment” I was talking about before. It turned out to be not the only one, but from the start, it was the main thing I wished to try.
So, the answer is – it's the good old lazy daisy stitch used as a filler.
I will not lie and say that it is something I came up with on my own. Actually, what inspired me were books by Japanese embroidery artist Sadako Tatsuka, who uses lazy daisy stitch as a filler in quite a number of her gorgeous designs.
Although it looks different than in her works, I still like how it turned out here. It is so different from satin stitch or long and short stitch or line stitches which are usually used as fillers! I can't even find the right words to describe this look, but it gives off ... the softer and fluffier vibes? It is fresh and unconventional and I appreciate its contribution to the overall work!
The berries twig is quite straightforward, unlike the previous element. Although here too, I found a way to change some ways. In particular, in the berries shapes, instead of a regular satin stitch where all the stitches are strictly parallel to each other, I directed all of the stitches to the lower base point.
The heart of the design is a flower shape, which is filled with long and short stitch for the main body of the petals and split stitch for the folded parts. Does it remind of Cecelia Rose? Yeah, it's worked almost the same way. Somehow, this combination of stitches is too attractive to me.
The center of the flower includes french knot pistils of varying length as well as satin stitched circle and few rings of around it – the lighter one in split stitch, and the darker one in stem stitch. By the way, there's no black color in this design. I don't like using it in my works, so instead there's a dark brownish hue.
Now, to the little flowers!
They became yet another experiment for me, although initially, I was going to work them using customary buttonhole stitch. But if we already started experiments, why not continue, right?
So, that's how I got the idea to try the Danish knot for the petals and wrap them in lazy daisy stitch.
Danish knot is something you will see in hand embroidery once in a blue moon. Me too, I've never used it in an actual needlework before, only practiced it a little just for the sake of it. Which is a bit unfair, in my mind. I mean the stitch is so amusing!
So, I decided to give it a chance to shine in this design and totally didn't regret! These quirky petals which look like a complicated thread clump woven together are a whole mood, haha.
So, here's how to work Danish knot stitch:
First, make a straight stitch from A to B – this will be the widest part of your stitch, the upper ground. Next, come up through the fabric at point C, which is somewhere below the previous stitch and between the A and B points.
As you emerge from the fabric, slide the needle under the AB stitch from above.
After that, slide the needle under the AB stitch again, but this time to the other side of the previous loop and tuck the free end of the thread under the needle.
This way a new loop will be formed, which you can secure by bringing the needle down through the fabric again – at the C point or right next to it. Also, you can extend this part and secure the last loop further away from the point C to have a sharper tip.
I made my Danish knots rather compact and then make lazy daisy stitches with the knots inside. Cute quirky flowers ready!
I'm satisfied with how this practice piece turned out and especially, that I got to try some stitches and techniques that I don't usually use. It feels so good to step out of your comfort zone once in a while!
Sorry, I didn't prepare any digital pattern for this design! It was something I sketched and colored on a piece of office paper. If there's demand, I can trace it for you later.
But in any case, I encourage you all to try some new stitches and techniques in your next projects too! It is a good way to boost your creativity and find new inspiration! Some things might not go according to the plan, but just enjoy the ride and have fun with experiments :)


Palestrina Stitch
ReplyDelete