Starting today, let's take
a look at the stitching technique called “Lattice”! I have 3 lessons
planned, with the first one being just the basics.
Now, I don't know if
you've already noticed, but the terminology area in hand embroidery
can be a bit confusing at times. One book calls a stitch “A”, the
other one calls it “B”, on the internet you can find articles
attributing other names to it...
This situation is can be
applied to Lattice technique too. Some sources call it just like
that: “lattice stitch” or “Lattice work”. That's the name I
learned this technique as, so I'm going to be using the same term.
However, you can find also stumble upon terms“Trellis work”,
“Trellis”, “Laid work”, etc.
Essentially, this
technique is prevalent in Crewel embroidery (also known as Jacobean
embroidery) so if you want to learn more about Lattice, I suppose it
is better to dig deeper in that department. I personally take it easy
with terminology, for now, and pay more attention to miscellaneous
ways of working this stitch.
And there are actually
LOTS of ways!
Today I will only show you
the basics. The skeleton of this technique. But next time, you and
me, we will explore the vast possibilities of playing with this
stitch, and it's going to be a lot of fun! :)
Here are some examples of
Lattice work in my older projects:
From left to right, these
are details from Crewel heart, Fall wedding, Snowflake Mandala. The first one looks a little more complicated and fun,
doesn't it? The other two are the perfect examples of basic Lattice
work.
Lattice embroidery lesson
Everything is simple!
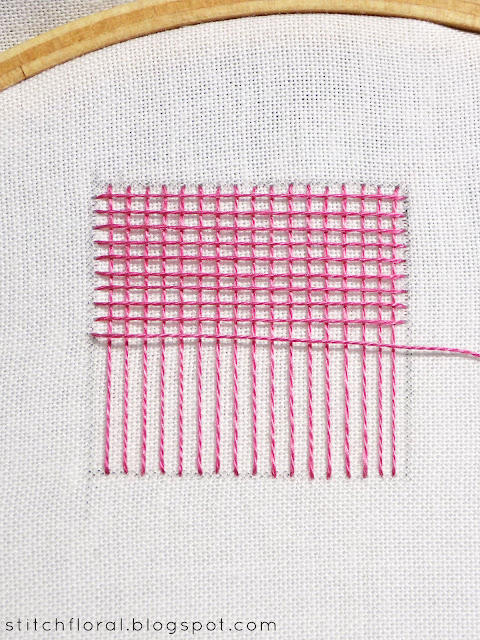
First, you need to make a
greed out of your thread.
Make a row of stitches,
starting with vertical ones, for example.
And then lay horizontal
stitches over them.
Until you have a grid.
Now, about this grid... I
usually lay it without any thorough measuring, to be honest. Of
course, if you are using nice linen, you should be able to count
holes in the fabric's weaving between the stitches. It will make the
grid even. I normally use cotton, though, and I'm not fond of sitting
and measuring every stitch with a ruler so I do it with my eyes.
Naturally, it is not
perfect, haha. You can see some of the squares that the grid creates,
aren't even, But I forgive it to myself :)
If you want your grid to
be perfect, though, I suggest using a ruler or counting holes!
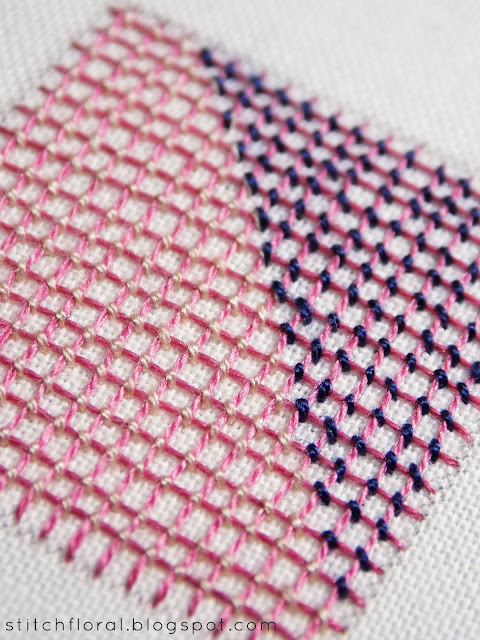
After our grid is ready,
we start couching the threads in the place of their
intersection.
For the basic Lattice, it
is enough to do just one diagonal couching stitch to keep the thread
in place. Make sure all the diagonal stitches are worked in the same
direction, though. The inconsistency in this can influence the look of
the lattice quite badly. Be careful!
Even with the basics of
this technique you can achieve captivating results.
For example, you can
switch the color of couching thread to create a special effect :)
Lattice over satin stitch
Lattice work is an open
filling by itself. It leaves the background easily visible for the
eye of the audience. However, you might want to cover fabric with a
particular color and then work the lattice grid over it. In this
case, satin stitch or long and short stitch are your
helpers.
I'm using satin stitch for
this example just to show the principle. But I hope you realize that
lattice worked over long and short stitching with color blending,
would have a bomb look! :)
So, first, we work the
satin stitch padding for the shape, and then lay the thread grid
right on top (sorry for the Minions
color scheme, I've only just noticed, haha).
Then, couch the threads in
the intersections. I used cross stitches here – two diagonal
stitches lying on top of each other. By the way, here the order of
working cross stitches matters as well. I mean, if you make the first
one in a particular manner (for example, first a diagonal stitch from the right to
the left, then from the left to the right), then you should continue
in the same way till the end. It is actually noticeable when the
stitches are different and it kind of rubs the eye when you look at
the work.
And that's all! It's
really easy. isn't it? And it looks very pretty, even if you work it
all in the same color!
So we finished with the
basics, but the most fun is ahead! Next time, let's try different
ways of couching threads, as well as different types of grids. You'd
be surprised to know how many faces this technique has. That's my
favorite part, I can't wait!


Thanks, Amina, very clear lesson on lattice!
ReplyDeleteThank you, Maria!
DeleteThank you so much, this is a gorgeous stitch, can't wait to embroid it too :)
ReplyDeleteYeah, totally worth trying! I'm happy you liked :)
Delete