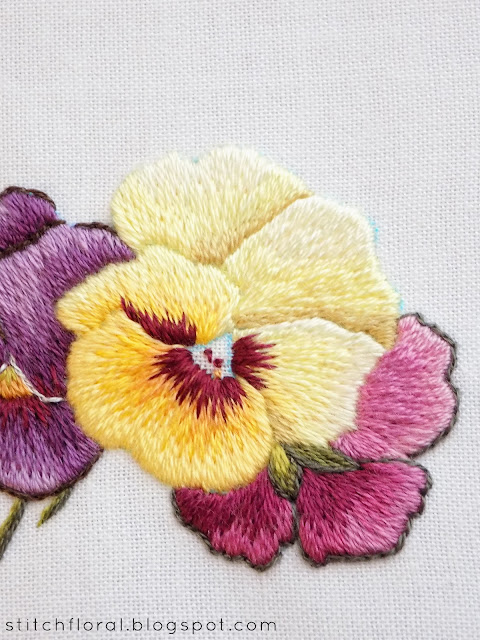
Finally, part 4 of the Needle Painting stitch along is here! Sorry for the delay, it's just that the last flower took me longer than I expected. This is the last part, so I really want to hear your thoughts about it! Was everything clear? Did you lack any information and detail? Write in the comment section or contact form! And now, let's dive into the stitching process :)
I said that the last flower took me longer, but it doesn't mean that it really is so time consuming... What I want to say is, I can take pictures only during the daylight for the better quality. And because the days are extremely short now and I have other things to do, so I have around 3 hours a day for capturing my stitching process of whatever I'm working on. With the previous flowers, it was enough, but I didn't manage to complete this one in one go and had to continue the next day.
Just wanted to make it clear, so that you don't get scared and think that it takes forever to stitch this pansy :)
A reminder: check these posts if you didn't yet, so that everything makes sense.
Let's go!
I usually complete one flower after another, but this time decided to work all the areas with this shade of floss in different petals, just like Trish Burr suggests. As always, I make the guiding stitches first and then fill in the gaps.
The first petal is ready. Added one more row of a darker shade of yellow floss and then a bit “shading” with yellow-green closer to the next petal.
This petal is worked a bit differently. You can see that only a corner of it has the light yellow shade. So I decided to complete the part below it with a darker shade and then stitch the right part of the petal. The right part is worked the same way (first row of stitches, then the second row of stitches) but with the same color of floss. And a bit of shading again next to the other petal.
Fast forwarding to the next petal. The process is the same. The tough part was that the pattern in the book doesn't provide clear borders for the color areas and the pictures for this pansy aren't very explicit either. So this petal and the next one are basically results of my guesswork and improvisation.
Colors are getting more vivid here :)
Now the last petal. It is almost a complete semicircle and because the direction of stitches changes from one slanting angle to another one, I recommend making a lot of guiding stitches before making the first row.
In Part 3 I said that you don't have to make guiding stitches for the 2nd and 3rd rows of long and short stitching, but this case is an exception. For the stitches to slant in correct angles and for the smooth look, I used the guiding stitches here and filled in the gaps.
Almost ready! The colors are so pretty! Reminds me of fuzzy chicks, haha.
I LOVE the contrast between the light soft yellow and burgundy!
The center is worked exactly the same way as I described in Part 3.
And the shading outline. Pansies are complete now!
Honestly, I liked stitching these little ones. Aren't they cute??
Actually, I expected a worse result and more troubles, but I'm pleasantly surprised by the outcome. I like the variety of colors and the fact that all the skeins I used are almost untouched and can be used in other projects. Miniature needle painting doesn't require that much thread, however the number of colors used here is impressive.
If I am to unleash my inner critique I'd say that I am not really satisfied by the shading outline – it is too thick for my taste. But as I mentioned earlier, the reason could be in using a floss thread and not sewing thread as Trish Burr did.
Also, the edges of the petals could be better. I tried to make them neater for the yellow pansy in the middle and I think it improved compared to the purple one. But still not “there”.
Otherwise.. I'm really happy with the result! Really, needle painting is not as scary as it seems at first sight :) And it is a PERFECT way to practice your long and short stitching. Personally, I feel more confident in my skills after completing Trish Burr's pansies.
What are your thoughts? Did you try following along with the stitching process? What are the scariest and most difficult aspects of needle painting for you?


Your work is awesome! Thanks for teaching us
ReplyDeleteMy pleasure :)
DeleteThank you reading your lessons has been very helpful. I am about to begin a Spanish shawl and all your tips are very useful. Thanks again.
ReplyDeleteThank you for reading and enjoying! :)
DeleteThank you so much Amina for teaching us.
ReplyDeleteNo problem :)
DeleteWow what a beautiful informative way you showed and with clear written instructions I am now more in tune with how to do embroidery painting. Thankyou sooo much. ♥️🌹
ReplyDeleteSpiegato molto bene, brava!
ReplyDelete