The last member of the line stitches family! Let's get it!
I have to warn you, that Rope stitch might seem a little difficult when you try it the first time, because of the manipulation with the thread and how the loops form. But I will try to break it down as clear as possible with step by step pictures of the process.
Also, what you might want to know beforehand, it actually belongs to the chain stitch family and basically a variation of a twisted chain stitch. If you've learned how to work twisted chain stitch, the rope one will be easy for you.
And if you don't know, then congratulations! After you learn rope stitch, you can say you know twisted chain as well.
I didn't include rope stitch to the chain stitch family in the Stitch Library only because of its look. It creates a look of a solid thick line, quite dimensional at that, so it really looks like a rope or a cord of sorts.
Now, let's see how to work it.
How to work Rope Stitch
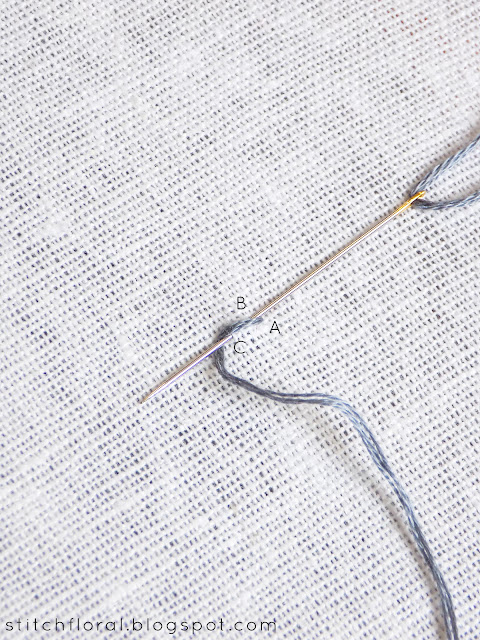
Take a threaded needle and come up through the fabric at point A, then bring the needle back to the fabric at point B and come up again at point C. Now, points A and B have to be really close to each other and the distance between them will decide on the width of the “rope”. Also, point B lies just a little further ahead of point A.
As your needle emerges at point C, you have to wrap the thread around the shaft in the following way.
Here are step by step pictures to make it clearer. You might also notice how point B is situated with regards to point A.
Pull the needle through and as you do that, you will get a twisted chain stitch. Now you know how to work it, isn't it wonderful!
What you do next is bring the needle down in the fabric at the point next to point B, but ahead of it, and come up through the fabric further ahead along the line.
Here is a picture from a different angle.
As you pull the needle through again, your stitches lie next to each other and already start forming a solid line. Later you will see how dimensional it really is compared to other stitches, but for now, let's just stick to working the line.
Let's say you reached the end of the line. How do you finish it? Actually, I didn't see any particular tips on this moment except for ending it the same way as chain stitch. Which totally doesn't satisfy me. I mean, the stitch looks like a rope at the start, so it should look like a rope in the end as well – that's what I think.
So if you just end the line by making a tiny anchoring stitch...
You will end up with the “insides” of your rope coming out in the not prettiest of ways, like in the picture above... I personally don't like it. So, what I do is I make a simple straight stitch covering it all.
And viola! Everything is hidden, and the look of the rope is consistent. Nothing gives away that it was worked using twisted chain stitch.
To demonstrate how really thick and dimensional the line is, here is a comparison with stem stitch, which I worked using the same number of strands.
Tips
I used cotton embroidery floss for the rope stitch tutorial, but you might want to use pearl cotton (perle cotton) for it as well. Moreover, using it might grant your rope stitch a more textured look if that's what you like.
Also, rope stitch is fit for stitching curves and waves, but the tight ones could be a struggle. As for the more open and wavy curves – rope stitch will take them well if you make the stitches slightly longer, that's all.
Don't be scared to try this stitch, it is really not that difficult as it might seem. Just follow the pictures and you will soon get a handle on it! It is always fun to add some unusual stitches to your projects and make them more diverse :)


Thank you - the directions are spot on and easy to follow.
ReplyDelete