Oh my, this post is long overdue! I was planning to post it earlier, but life happened and... Anyway, here it is! The last stitch from the chain stitch family. And it's pretty easy!
If I am completely honest, I'm having a hard time to ascribe this stitch to chain stitch family, because the way it is worked definitely reminds me more of buttonhole stitch and fly stitch loops. If it were up to me, I'd call it double fly stitch.
But it's been called double chain stitch since long time ago, and all of the stitch books I've met also put it in this family. So, on this blog, we will also consider it as a part of chain stitch family as well. Nevertheless, I would recommend checking out the Buttonhole basics and Fly stitch to have a broader picture.
Also, here are chain stitch basics if you are new to this stitch:
Now, on to the real deal.
How to work Double chain stitch
Double chain stitch is worked on two lines which you can mark with erasable or permanent markers since the stitches are going to cover them entirely.
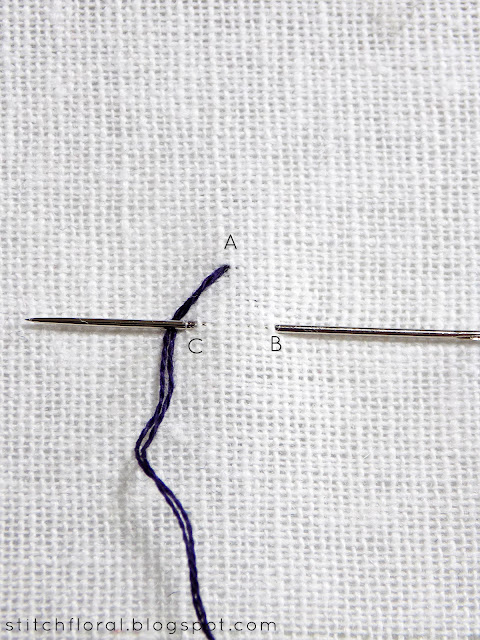
1. First, we bring the needle to the surface of the fabric on the top line a little away from its start (point A). Then we insert the needle at the start of the bottom line (point B) and come through the fabric at point C, tucking the thread under the needle shaft. Note how points ABC form a triangle! Point A lies somewhere in the middle between C and B.
2. Pull the needle through and you will get a triangle with one missing side. At this point it looks more like a fly stitch, doesn't it?
3. Next, we insert the needle at point A, where we have initially started and bring it back up a stitch length away, tucking the thread under the needle shaft again. Another triangle!
4. When we are making the third triangle we insert the needle in the left corner of the previous one, inside the loop.
5. Again, every new stitch we start in the corner of the previous one, inside the loop.
6. And so it goes.
Um, I didn't really finish my line, since it was only for demonstration. But if you are using the double chain stitch in any half-serious project and you want it to look wholesome I recommend making a straight stitch from A to B to complete the missing side there.
Also, I wanted to take a moment and show you a way to use twisted chain stitch! I've never considered it as a circle border or frame, but it really adds a bit of charm to an already pretty design :)
Tomorrow I plan to post the Lavender miniature design and tutorial, so stay tuned! :)


No comments
Write what you think! ❤
Note: Only a member of this blog may post a comment.