Our ribbon embroidery festival this month is continuing! After learning the basics of ribbon embroidery, how to start and end the ribbon when you work it, it is time to practice some basic stitches.
In fact, some stitches you already know from hand embroidery and have probably already done them with thread. Actually, quite a lot of surface embroidery stitches can be worked with ribbons of smaller width because the scale of the material is similar. But when it comes to bigger and wider ribbons, replicating the hand embroidery stitches becomes impossible save for a few.
Also, there are some exclusive stitches, moves, and techniques which are possible to work only with ribbons. We will take a look at a few today and later you will learn more during our festival.
Lastly, we will practice few stitches working a pretty little flower :)
Straight stitch
Let's start with the most basic stitch.
It's a straight stitch and we work it by coming up through the fabric at the beginning point of the stitch and then inserting the needle at the point where the stitch ends.
Usually, because of the ribbon's width, these stitches will have sharp corners at the beginning and ending points, so it already looks like a petal.
You can raise the stitch a little to give it more volume.
Like that the stitch becomes more dimensional and doesn't have a sharp corner at the end.
Ribbon stitch
This one is ribbon exclusive. And one of my favorite!
So, you come up to the front of the fabric at the beginning point, lay the ribbon down and pierce it where the stitch is supposed to end.
When you pull the ribbon through, the stitch will have these nicely folded edges. My stitch has a sharp corner at the end, but, in fact, it won't necessarily look like that. It can have softer, rounder form at the end. Also, you can change the place of piercing the stitch – to the left side, or to the right side, and then the folding will be more intensive on one side.
You can achieve many various looks with this stitch, it is very versatile, so make sure to try it out!
Looped stitch
Another quite dimensional stitch.
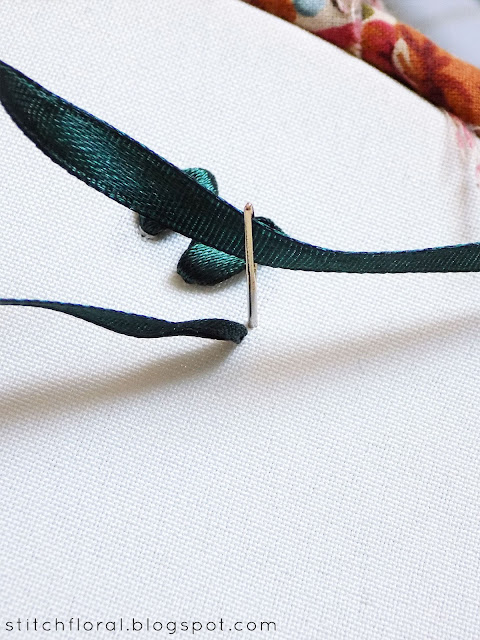
Start the stitch by bringing the ribbon to the surface of the fabric at the beginning point and then inserting the needle close to the starting point, right behind/in front of it.
This one fits softer ribbons better. I'm showing in satin ribbon like for other stitches, but satin ribbon is just a tad bit more rigid than silk so the stitch stands upright, haha. If you use silk ribbon or a softer satin ribbon, it will lay flat on the surface of the fabric.
But even if you only have a satin ribbon you can still make it work if you anchor it with a discreet stitch in thread of the same color, attaching it to the fabric.
Lazy daisy
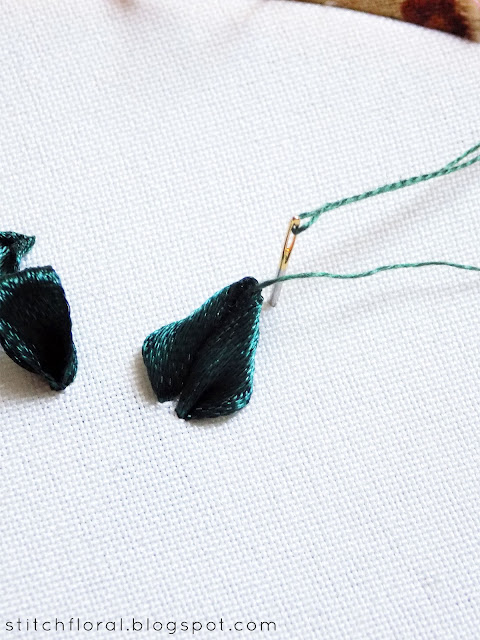
Yes yes, this is the ribbon cousin of our beloved lazy daisy stitch. If you're using a narrow ribbon, you can work it exactly like the one we make in thread.
However, for bigger ribbons, some adjustments need to be arranged. To be more precise, we need a thread to make the anchoring stitch. You can take the thread in the same color as the ribbon, to make it less evident, or use a complimentary/contrasting color to boost the visual.
So what we do, is start the stitch at the beginning point and insert the needle next to it, to the right or to the left side.
As you pull the ribbon and give the stitch its desired length and form, take another needle and thread to make the anchoring stitch.
So here's how it looks. You can vary the length and the thread color, so it can actually have many different appearances.
Twisted stem
Naturally, this stitch is not limited only to working flower stems, but still the most common way of using it is for stems and twigs.
After you bring the ribbon to the front side of the fabric, start twisting the ribbon on itself. Then insert the needle at the ending point of the stitch.
Thanks to the twisting, more often than not, your stitch will bend or curve in some way, which also looks pretty natural for stems. If you want to give it some special form or curve you can use thread to make dsicreet stitches that will hold it in the place and form you need.
Practice flower
Now, how about working a little flower to practice ribbon embroidery?
I couldn't help but use my favorite stitches here, but you can use any stitch you want. Actually, to practice more seriously, I believe it is better to make flowers with each of described above stitches. This way you will get more used to ribbon as your material and will understand its behavior better.
For this flower, I used 2 satin ribbons and one organza (the yellow one). The green ribbon is 12 mm, the red one is 25 mm, the yellow one is 4 mm. And the whole flower will take you 10-15 minutes to work. 5 minutes if you already got used to ribbons.
As you see from the first picture, the stem didn't want to keep the curve, so I fixed it with a couple of hidden stitches in thread of the same color. They need to be very small to stay hidden though, be careful.
And yes, that's a french knot worked in ribbon! You can do that easily with narrow ribbons. The wider ones will present more struggle, but if necessary, it is still possible. Just don't hurry when you do the knots, they require some patience.
So, now you know some basic stitches for ribbon embroidery which is quite enough to get you started. Practice, make yourself accustomed to the new material and we will continue our festival in the next post! Stay tuned :)


Wonderful! I love your descriptions! I'm new to ribbon embroidery but have no trouble following these steps! Thank-you, Rebecca Rowe
ReplyDeleteWonderful! I love your descriptions! I'm new to ribbon embroidery but have no trouble following these steps! Thank-you, Rebecca Rowe
ReplyDelete