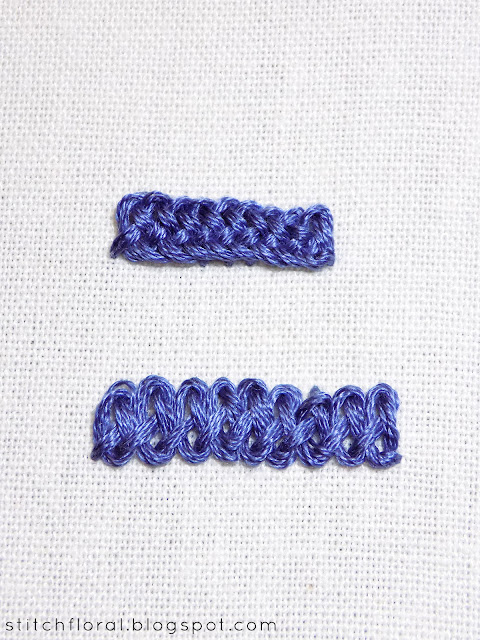
How is everyone? Hope you're doing well! Today we're going to learn the last two stitches from this month.
Braid stitch and Plaited braided stitch. As you may guess, they are related to each other. Basically, you can learn the braid stitch and then add one step to it and it will turn into the plaited one.
The process of working the stitches is not really that hard. That is, as long as you understand how exactly the needle moves. So, I did my best to make the demonstration as detailed as possible, and it resulted in quite a few pictures. After thinking it through, I decided to make my tutorials in the form of a grid today and not clutter the post with a big number of pictures. I guess it will be easier to read it that way, right? Tell me in the comments what you think :)
Anyway, let's start!
Braid stitch
1. First of all, we are working the braid stitch between two lines. It is always better to mark them. I was a lazy bum and didn't mark anything and you will see some of the stitches sticking out. So, mark the side lines if you want the border to be perfect :)
Bring the needle up through the fabric on the left top side of your future border. Put the needle under the working thread.
2. Wrap the thread around the needle's shaft once. Remember that your needle should go under the working thread in the previous step. If something goes wrong and you won't get the loop like in the pictures, it's probably because the needle didn't go under the thread. So be attentive here.
3. Insert the needle on the right side of the border, a little below the level of the first point.
4. The needle comes out on the left side of the border, opposite to the previous point. Note how the loop looks like, which part of the thread goes above the other. If yours is different, then go to step 1 and make sure you bring the needle under the thread. Sorry for repeating it so many times, haha.
Anyway, pull the thread a little tighter and tuck the working end of thread under the needle. This step is also very important. If the stitch doesn't come out as it should it might be that you forgot to tuck the thread under the needle point here.
5. Pull the needle and thread through. This is a complete stitch.
6. For the next stitch repeat step 1 wrapping the thread around the needle and inserting it a little below the previous stitch and inside the loop, and coming out on the opposite side of the border and out of the loop. Don't forget to tuck the thread under the needle!
That's all!
Like I said if something doesn't work there might be two reasons:
- either you made the wrap around the needle from the wrong side
- or you forgot to tuck the thread under the needle.
Practice this border and then try the plaited braid stitch!
Plaited braid stitch
In this tutorial, you will see the same process of working it as you may find in diagrams around the web if you search up the name of the stitch.
Personally, I prefer this way of working it. It seems easier to me. But there is actually another method which you can find on youtube in a few videos. Make sure to check it out if the method below doesn't work for you.
1-2. The first two steps are essentially what you do in the braid stitch. The very same thing, no changes at all.
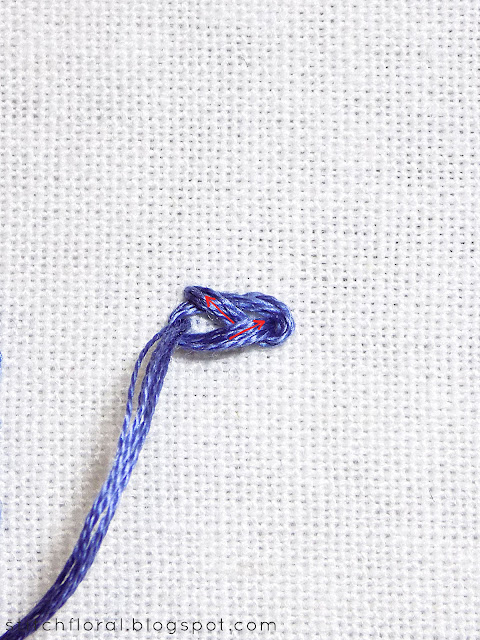
3. And now an extra step! In the knot that you get in step 2, you can see the thread forming two crossing lines in the middle. Like a pretzel? If you don't understand, take a look below, I will post a picture with these crossing lines marked. If you found them, then slide your needle under them, from the right to the left.
I'm sliding my needle with the eye forward to not snag on any thread. If you can, just use tapestry needle with a blunt point.
4. After you slide the needle through a loop will form. Don't pull the thread completely and leave enough of that loop on the surface of the fabric.
5. Insert the needle on the right side of the border and bring the needle out on the left, the two points lying opposite each other. Note the position of the needle and loop. You insert the needle inside the loop, but bring it out of the loop. Tuck the working thread under the needle point.
6. Pull the needle through. Keep working the border repeating steps 3 to 6.
Here's a closer look to the crossing lines from the step 3.
Slide the needle under the both of them.
And make a stitch inserting the needle inside the loop that formed from the previous step. The tip of the needle is outside of the loop and goes over the free end of the thread.
Here's the finished border.
You might notice that my border became narrower in the bottom. That's why you shouldn't be a lazy bum and should mark the side lines! Haha.
One last tip. In the plaited braid stitch, even if you work it correctly, the thread might shift to the left side because you keep sliding and pulling the needle from the right to the left. That's normal! Just fix it with your fingers, placing the thread correctly.
And if this frustrates you too much, you can actually make a discreet stitch at step 3, inserting the needle and bringing it up under the crossed lines. It will ground your thread and it won't shift to the side.
That's all!
The new stitches this month were ones of my favorites! They are not your “every day” stitches, but when you want to work a dimensional border that makes a statement and draws the attention, I think they are perfectly fit for the job!
Check out the other stitches in this Library!


No comments
Write what you think! ❤
Note: Only a member of this blog may post a comment.