Time for a new miniature tutorial! Who's ready to stitch a lovely Primrose? :)
This month we are stitching few easy-peasy spring flowers as miniatures for a bit of embroidering practice. This way seasoned stitchers can flex their muscles during a quick session, and beginners have a great chance to start with something small but still valuable. You need bricks to build a wall. And you can use multiple quick stitching practices to get used to embroidery and get a hang of it.
Here is the full list of tutorials from this project:
- Primrose
As I warned in the previous post, the Primrose design might actually take you longer than the ones we stitched before. Because now we get to work long and short stitch here, and it usually takes a bit more time, especially if you are a beginner.
No worries, though! It is still a miniature so you will finish it quickly :)
Here's the hero of today's tutorial:
It is a bit quirky and fun, but so cute! Is it just me, or the flowers look curious, as if they are peeking out?
I didn't see them like that when I sketched the designs, to be honest. That's always the most fun part of embroidering: when your design starts living on its own and gets a tangible character!
Anyway, let's start with the tutorial! Catch the PDF pattern at the end of the post.
Primrose embroidery tutorial
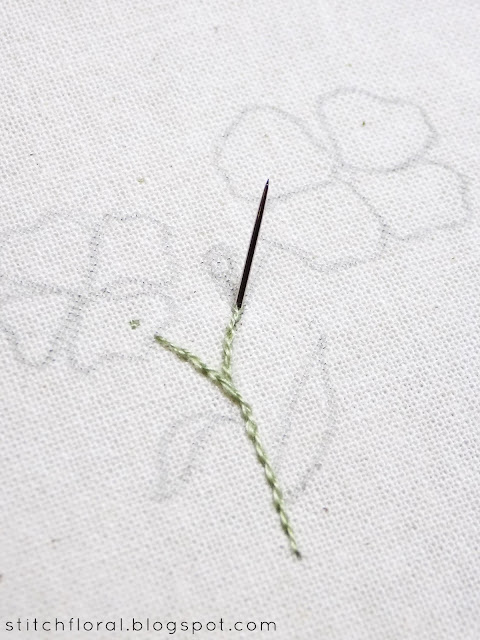
1. We start by working the stem in 1 strand of floss. I'm using split stitch here, but you can also use stem stitch or back stitch or any other line stitch you like for that matter.
(Also don't mind the ominous-looking needle, it's not really black, it's just the light angle)
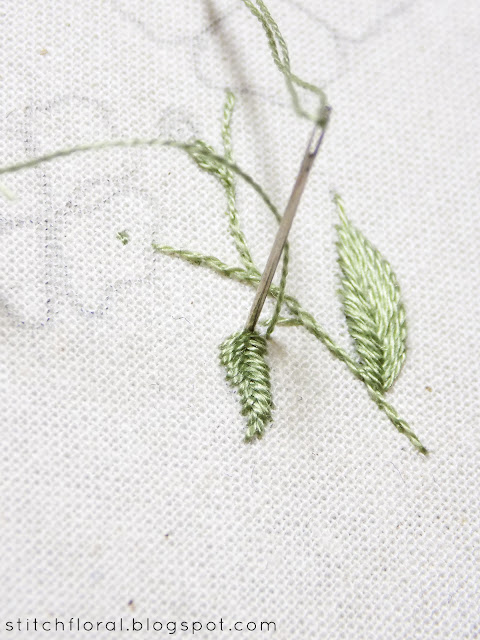
2. I used fishbone stitch to work the leaves. The right one is pretty simple to work thanks to its simple shape. The left one, however, might be a bit more tricky, but it just requires shorter stitches.
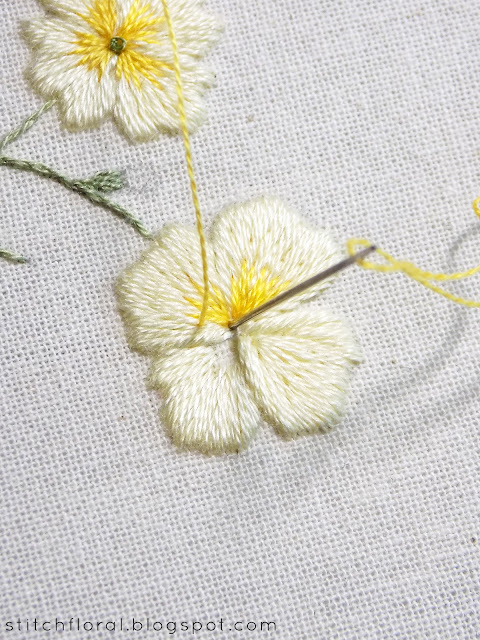
3. Time for the main part! We work the petals of these flowers with long and short stitching, making an outline first, then put few guiding stitches that help us to stick to the right direction of stitches, and then complete the row. I used split back stitch for the outline, as it is easier when the line is a little ragged.
In some petals, I added few extra stitches of the same color as the second row (see the complete petal to the right in the picture above).
Don't forget to vary the length of your stitches to make the filling smoother.
4. Throwing in a brighter orange color for the base of the petals. It is okay that the colors don't blend 100%, because that's not really the effect we need here. The colors are too far from each other anyway (we talked about color blending here). Just make sure the stitches vary in length and there aren't too many of them for this color – just enough to cover the gaps.
5. A french knot (or a colonial knot, alternatively) for the center of the flower.
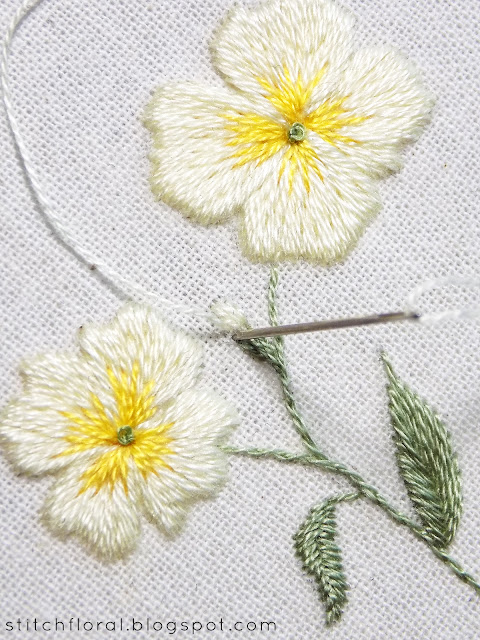
6. And lastly, the little blossom! I worked the receptacle as a couple of parallel short split stitch lines. And the petals can be worked simply as few straight stitches.
And that's all! Your primrose is complete!
It is a bit more complicated than the previous miniatures, but we have to try various things in these practice sessions, don't we?
Anyway, the result is totally worth the effort! By the way, I can totally see this cutie as a decoration for clothes – on a shirt pocket or jeans for example. Ah, I really want to try embroidering on my clothes sometime, it would be a first for me :)
So, next time we will stitch a tulip! It is going to contain some long and short stitching again, beware :) See you!


Great hand embroidery tutorial. Keep up the nice work.
ReplyDeleteRegards,
Kristen from Embroidery Digitizing
Thank you, Kristen :)
DeleteLooks fantastic, thank you so much for sharing. Can’t wait to try it out.
ReplyDeleteWhat thread colors did you use for this project? I assume it is DMC?
Thank you, Charlie! Hope you enjoy working it. It is DMC 746,743,522 :)
DeleteYour tutorial is very useful to learn embroidery. thanks!
ReplyDeleteYou're welcome! ❤
DeleteThanks for the free pdf patterns. Your look bigger than how they print out. What size are they suppose to be?
ReplyDeleteThey are indeed very small, hence the "miniatures" name :) the pictures are close-ups, that's why they might look bigger.
ReplyDeletehttps://stitchfloral.blogspot.com/2018/05/april-round-up-new-stitch-along-heads-up.html
Here you can compare their size to a plastic bobbin.
Thank you *so much* for these free patterns and instructions! I am brand new to embroidery and really want to be serious about it but have no one to teach me, and these designs are so lovely! Thank you!
ReplyDeleteQuestion: On the pattern, it says, "Reversed pattern for iron-on transferring." How do I do iron-on transferring with the computer printed pattern? Thanks!
ReplyDeleteHi, Sarah!
DeleteThere are special pens for iron-on transferring on fabric, and to use them you would need a flipped image.
You take the flipped image, trace it with that special pen, then take the fabric, put the paper face down on it and iron. Like that, the inks will transfer to the fabric mirroring the image from the paper (that's why we needed to flip it). But be aware that they are permanent! :)
Ok, thank you so much for explaining. :)
ReplyDeleteHey! Well-written blog. It is the best thing that I have read on the internet today. Moreover, if you are looking for the solution of QuickBooks Software, visit at QuickBooks Customer Service to get your issues resolved quickly.
ReplyDeleteAmina you have outstanding blog and you know what my mom has also design some of these art. I know it is not a easy to work on it take lots of time but at the end the result is just wow. Keep it up and wish you all the best for your course. embroidery digitizing in usa
ReplyDeleteNice Blog !
ReplyDeleteQuickBooks Error 1328 is an issue that may appear when you are working on QuickBooks. Due to this issue, you may not be able to work on your system.
I've read this blog, what a lovely design for Embroidery Digitizing
ReplyDeleteThanks for sharing this awesome post it was very informative Plz share more post like this
ReplyDeleteWOMEN LEATHER BOMBER JACKETS
Womens Leather Vest
Men Leather Vest
Your blog posts are more interesting and impressive. I think there are many people like and visit it regularly, including me. I appreciate your own position and I will be sure to come back here. article submission site
ReplyDelete
ReplyDeleteLeather bubble jacket mens is one of the luxury Lambskin Leather Jackets of Tapfer Jacket shop. Cowhide puffer leather Jacket has Durable Tonal Viscose lining and Detachable Opossum Fur Collar Trim. Triple Stitched Durable Nylon Thread.
Good content!!
ReplyDeleteIf you are looking for a Quickbooks Customer Serviceyou can contact us at.+1 855-675-3194,Nevada+1 855-675-3194,Nevada
Wow what a great piece of art, embroidery is an amazing skill, after watching your tutorial, i also feel that i should also learn it. But sometimes your site shows some error to open, and than i use VPN for open it, if you also want to use VPN, than you can checkout Hide.me VPN Discount offers. and keep sharing new amazing tutorials for us.
ReplyDelete