Ribbon embroidery festival, anyone?
For the next two weeks, we will have a ribbon embroidery festival here on StitchFloral! We will go through some basics, learn enough stitches for you to get used to this craft and create something beautiful yourself and will finish our festival with a tutorial for some serious piece.
How does that sound?
Don't know about you, I'm quite excited!
I already mentioned that ribbon embroidery was, in fact, the first thing I learned before I switched to hand embroidery. I haven't done it in a while. The last would be the Marigold botanical embroidery.
Now my hands were itching to play with ribbons again, and my family started missing my ribbon embroidery works, and lastly, I wanted to do something with my old silk scarf that I'm not going to wear anymore and ripping it in ribbons seemed a nice idea. Actually, I already tested the waters – you can see a small flower in my last Instagram post, it was done with a ribbon from my old scarf. I also was happy to know that some of you were interested in tutorials! So it added up and now we're having a festival!
We will not start with the stitches right away, though. Today we will talk about materials and tools and how to start and finish your ribbon when you embroider.
Needles
Specialty needles for ribbon embroidery do exist, but they are present mostly in online stores. If you decide to pursue ribbon embroidery more seriously, then maybe looking for these needles would be the best option. For me, ribbon embroidery was just a hobby and pastime, so I didn't really bother, to be honest.
There are needles for hand embroidery out there that are well fitted for using with ribbons.
As you see, the three main characteristics a needle should have to suit ribbon embroidery are: a large eye, a thick shaft, and a sharp point. All of that you can find in Chenille needles. They come in various sizes, suitable for smaller and bigger ribbons.
Tapestry and crewel needles also may come in handy for softer and smaller ribbons.
Ribbons
Today there's plenty of ribbons to choose from that would suit your project. Their width normally varies from 2mm to 50 mm which gives you the opportunity to create plenty of variety in your projects.
Ribbons also come in various textures. The most “desired” ribbon is probably a silk one. I haven't had the joy of working one, only a faux silk. But silk ribbons are delicate, soft to touch and pliable, they offer an elegant look to your work. If you have an opportunity, I would suggest using silk ribbons.
For me, it was pretty hard to find silk ribbons, so I usually used what I had an easy access to – satin ribbons. If you come to a sewing store here, there is a whole display of satin ribbons of all colors and widths, so it was easy to find something nice. They often have silk fibers in them, which makes them softer and more pliable too, however, the characteristic sheen still stays.
I personally don't mind satin ribbons at all, but because their colors are often too vibrant for my liking I opt to buy some neutrally toned ribbons and then color them to get achieve the effect I want.
You can also find organza ribbons. They are partly see-through which can add a nice variety of texture to your work.
Fabric
Just like with thread, pretty much any fabric will suit ribbon embroidery (linen, cotton, bomull, synthetic fabrics, etc.). I would like to point out a few things, though.
First of all, it is important to understand that ribbon is much thicker than thread. Even a small ribbon will require some space to be pulled through, not mentioning the wider ones. That's why it is better to use weaved fabric where you can pierce through a hole in the weaving as it can stretch around the ribbon when it will go through.
If the fabric is too solid and you are having a trouble pulling the ribbon through, you can try to widen the hole in the fabric using the manicure scissors.
Speaking of holes, here's an example.
This is a hole after I picked out a stitch, the ribbon was 6mm wide. You can imagine what can of a gaping hole there would be after a bigger ribbon (maybe I'll show you in another post).
I'm not scaring you or anything, these holes don't damage your work at all. But it is just something to be aware of. Because unlike in hand embroidery where we can undo a pretty big part of embroidery and still have a decent looking fabric, after ribbon embroidery your fabric is already destroyed, haha.
Lastly, using a lightweight and sheer fabric might not be a good idea if it isn't able to support the ribbons properly. And ribbons, although don't look like that, can be pretty heavy when worked in embroidery.
Other tools & materials
Scissors, hoops, pens, and markers for fabric – all the tools and materials for ribbon embroidery are pretty much the same as for hand embroidery. And if you already embroider, you already have everything you need. There are just a few more details that you need to know.
We don't wash ribbon embroidery. Usually, we don't, because it is bothersome and, unlike with hand embroidery, ribbons allow a pretty quick rate of work so it is unlikely for your work to get dirty or dusty. And ribbons lose half their charms after washing. And many ribbon embroidery artists color their ribbons which also means washing is a no-no. All in all, there's no need for washing, really.
And what that means is that you have to be careful with marking and transferring your design! If you are using a washable pen, make your marks smaller than the actual size of future ribbon objects, so that the marks don't peek out.
And one more tool that might surprise you is a flame – a lighter or a candle to be more exact. Because the thing is, a raw cut will fray, like the left ribbon in the picture above. If you burn the edge, the fibers will glue and stuck together, making your ribbon more durable – see the ribbon to the right. It will be needed when you will cut out shapes out of ribbon or just when you cut a new length of ribbon to work it.
Lastly, if you'd like, you can color your ribbons! You can do that before working it, coloring the whole ribbon. Or you can do that after you already embroidered it and color it when it is assembled on the fabric.
I frequently switch between the two options. For example, color my ribbon for leaves beforehand and color a big ribbon flower when it already worked on the fabric.
You can use paint for silk, paint for fabric, and watercolors.
How to start a ribbon
The process is similar for narrow and wide ribbons, except that I simplify it a little for the wider ones.
The first thing we do is we cut a length of ribbon. Usually not very long, probably the length of your forearm if it is a rather narrow ribbon and a bit longer for a wider one. We don't use a big length because while the ribbon is being pulled through the fabric and back it gets damaged to an extent and the longer it is, the more damaged it will look on one of the ends.
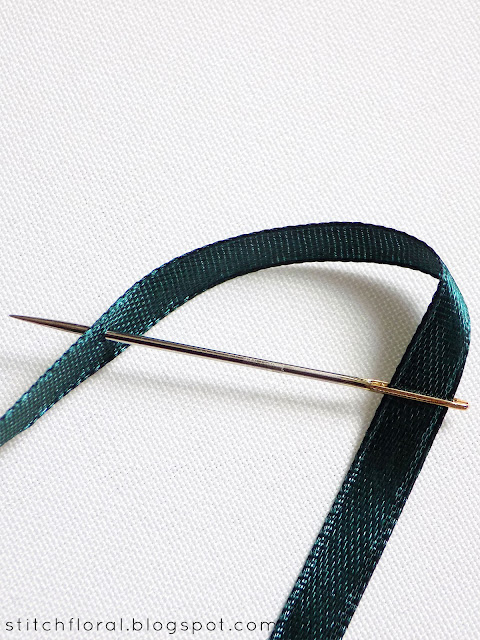
To fit the ribbon in the eye of the needle cut the end of it to acute angle (45 degrees or lower). The sharp end then can be put in the needle eye.
If you want to secure this end of the thread even better, you can move the needle down the length of the ribbon and then pierce through it closer to the end (but below the cut).
You will end up with a loop and you can adjust it according to your taste, maybe even up to the base of the needle. By the way, you can burn the cut of the ribbon so that it doesn't fray!
Now, like with thread, we can make a type of a “knot” with ribbons as well. Although it will be quite different and not really a knot.
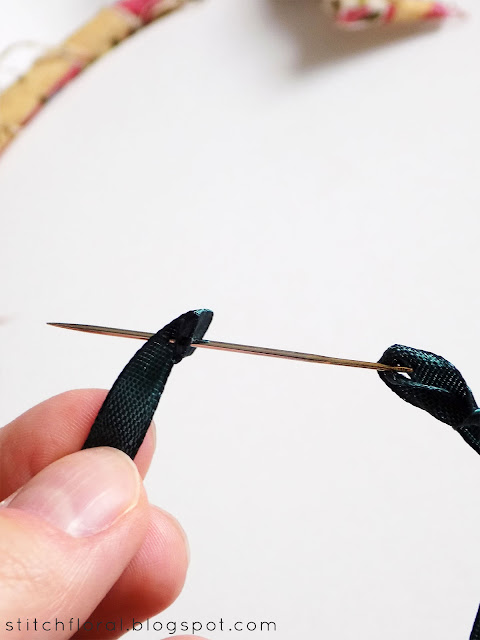
So, what you need to do is fold the other end of the ribbon 1-2 times and pierce through it.
This is what you'll get after pulling the thread through.
So when you bring the ribbon up through the fabric to the front side, your backside will look like this. This “knot” is flat and anchors the ribbon securely.
Note that this “knot” is also a bit large so if you want to make a stitch next to the previous one, try to avoid piercing through the ribbon on the background of possible (fabric is already enough to pull through, we don't need extra layers). Move the needle and ribbons on the backside
to grab only fabric.
Naturally, it's not always will be possible, but better to decrease the number of levels as much as you can.
How to end the ribbon
You will need a thread (simple sewing thread or floss. You can use something cheap here) and a needle.
Here's an example of how your backside will look like after stitching a very simple leaf.
Cut the waste end of the ribbon and take a threaded needle. Then secure it with few stitches on top of the other ribbon bits there.
That's all! Next time we will learn a few basic stitches and try to work our first simple flower. And for now, you can take ribbons of different widths (and textures) and practice starting and ending ribbon. If you're impatient for the next post, there is actually a little tutorial here, so you can try it.
I might have missed some points, so if you have questions, slide into the comments section and ask anything that makes you wonder.


Wow that was strange. I just wrote an incredibly
ReplyDeletelong comment but after I clicked submit my comment didn't
appear. Grrrr... well I'm not writing all that over again.
Anyhow, just wanted to say fantastic blog!
I'm sorry it happened :(
ReplyDeleteThank you!
Love your work and tutorials! Thank you! I'd like to use this cloth on my first project... do you know what it's called so I can figure out where to buy it? https://www.pinterest.at/pin/65654107052942499/
ReplyDeleteHi! I'm not sure, I don't specialize on this type of embroidery, but that's what I was able to find:
Deletehttps://www.arcoirisametro.com/en/products/fabrics/fabrics-other/fabric-for-yogoslavian-embroidery/?ref=56000028#.XiK-pf4zaUk
This comment has been removed by the author.
ReplyDeleteVery useful info. Hope to see more posts soon!. Canada visum online
ReplyDeleteThis blog is really great. The information here will surely be of some help to me. Thanks!. Canada Visa for German Citizens
ReplyDelete