
Are you excited to start
the new Stitch Along??
I hope everyone is ready
and has all the materials prepared. If not, then no worries! You can
catch up any time, just don't get nervous :)
Some reminders before we
start:
- If you don't have a pattern, sign up and check the Welcome message for information about Resource Library and the way to access it. You will find the pattern there.
- There will be lots of pictures so be aware of that if your connection is sensitive to a lot of data.
- This part is probably the most difficult one so IT IS FINE if you don't finish it by next Wednesday!
- Take your time, don't hurry. Next parts will be easier, you will have an opportunity to catch up!
- If you're new to long and short stitching, you might find this challenging. But that's why it is a challenge! :) Don't be scared, just do it for practice.
- Don't be sad if it doesn't look the same! Everything takes practice. If I attempted this few years ago, my stitching wouldn't look like it does now. Remember that I didn't start hand embroidery yesterday, I have already accumulated years of practice.
- Leave your questions in the comments or through the Contact form.
- Don't forget to post your results on Instagram with #hibiscuschallenge (and tag me please so I don't miss your posts/stories) or send me on e-mail aminakdesigns[@]hotmail.com. It would be perfect if we could see each other's results before each next part is published, to motivate each other :)
And now we start!
The colors we will be
using today: A, B, C,
D.
Today's stitches are:

This is the order in which
I will show you how to work the petals. Since I'm going to rotate the
hoop so that each petal stands vertically, the order might be
confusing – so please, refer to this chart to understand which
petal I will be talking about.
Also, I will show you
petals 1 and 2 from start to finish.
And then, to speed the
things up a little (well, from my subjective perspective) I will show
you how I work petals 3,4,5 in main color and then add shading to all
three at once.
You will understand it!
Outline

Before we start with long
and short stitching, we need to outline the petals.
Use color A. Why?
Because this color will be on the edge of the petals when we do long and short stitching :)
Use
Split Back Stitch to
work it, 1 strand of thread.
(optional: 2 strands of thread will make the petal rise a bit higher
from the surface of the fabric( = equals a bit more dimension).
1. Bring your thread up through the fabric and make a stitch along the
outline.
2. Come back up at a stitch distance from where the previous one ended
and pierce it from above.
3. Repeat the previous step and split the previous stitch again.
4. Keep working the outline for each petal.
Basically,
Split Back Stitch is like Back Stitch but you split the previous
stitch when you bring the needle down.

The
tube in the center is called style. We work it with Split
Back Stitch again. Take color
C and 1 strand of
thread.
5. Work the outline of the style first
6. And
then add a short extra line in between to fill empty space.
Petal 1

Take
color A and 1
strand of thread.
Mark
guiding lines right on the fabric with a pencil or pen so that it is
easier to maintain correct direction of stitches.
Rotate
your hoop so that the petal is vertical with its top looking upwards,
if that's more convenient for you (it is for me).
7. Start by working guiding stitches over the edge of the petal. Make as
many as you need and for now, they all can be similar in size.
8. Then fill the gaps between the guiding stitches. Again, don't fret
about any variety in length. For the first row of stitches, their
length can be the similar.
9. Keep filling the gaps between the guiding stitches. The two guiding
stitches are like a cage that helps you to make new stitches in a consistent and correct direction.
10. After the first row is complete, you can start the new one the same
way: first, lay guiding stitches and then start filling the gaps
between them. When you start the second row, you can now bother with
varying the length of your stitches. Also, if you pay attention, I've
already worked the sides as well.
11. Continue working the petal little by little, using the benefit of
guiding stitches. Try to keep direction of your stitches consistent
and vary their length.
12. When you reach the border of the next color area, switch your thread
to color B.
13. With color B you
almost reach the bottom of the petal.
14. Finish the first petal by adding several stitches in color
C.

Now
you can rotate the hoop back and see how it looks :)
Petal 2

15. Now we can work the second petal the same way. Start with guiding
stitches...
16. ...and
then fill the gaps between them.
17. Work the second row the same way, using guiding stitches and filling
the gaps between them. Don't forget to leave some empty space for
shading according to the pattern.
18. Usually, central parts are quite straightforward and easy to work so,
personally, I prefer to complete parts that are a bit trickier first.
In this case, that would be the sides.

19. Fill the petal's center as well.
20. Take color B and work the empty space pretty much to the bottom.
Follow the direction of stitches above, try to be consistent when
switching thread.
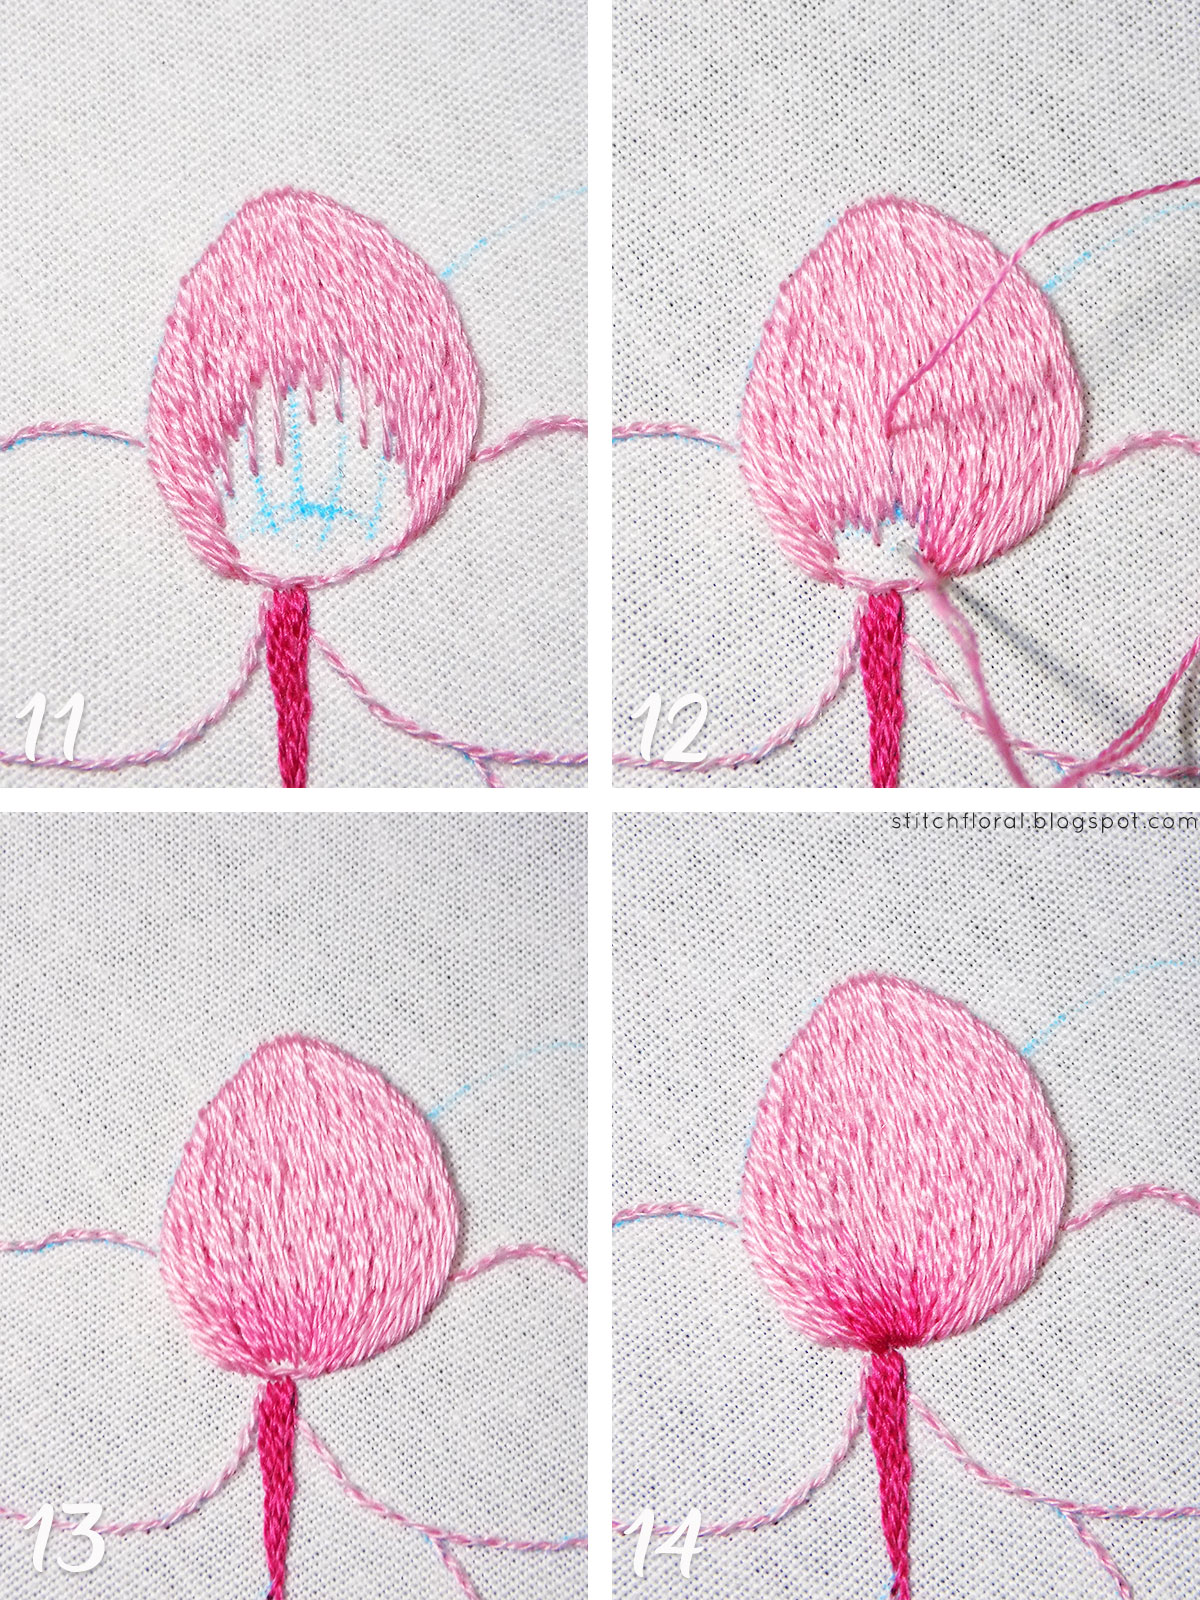
21. Add some tiny stitches in color C at the very bottom.
22. The finished petal.
Petals 3, 4, 5
Now
that you know how to work the petals, the pictures will be a little
less detailed. But the order is pretty much the same: working guiding
stitches → filling the gaps between them.

23-24. The area of color A in petal 3 is smaller.

25. This petal is probably the most difficult because of the curve that
it has. Our stitches are straight and can't bend, so we have to be
careful with how we manage their direction. Look closely at how I follow
the guidelines.
26-27. In such cases, it is often easier to make your rows generally shorter
so that the switch in stitches' direction is more subtle. Don't
change their direction abruptly, rather do it gradually.

28. And the last petal! Everything is like usual here. Work guiding
stitches and start filling the gaps between them.
29. Do
the same for every next row of stitches. Notice that I already worked the left side here.
30-31. There is again a change in direction of stitches on the left, be
careful with that place. If necessary, shorten your stitches and
strive to make the change subtle.
32. Don't forget to leave some empty space according to the pattern.

33. Now take color B and fill the empty space almost to the root.
Or to the very root if that's easier.
34. This is after adding color B to all the three petals.
35-36. And then add just a handful of tiny stitches in color C to the
places marked with arrows. For the fourth petal, you can place the last
stitches in color C in a line manner there.

37-38. Lastly, take thread D and make some French knots. Take
2 strands of thread and make 1 wrap around the needle. Place the
knots in a random order, and you can let the style to peek through.
And
that's all for now!

Everyone,
good luck with your works! Leave your questions in the comments if you have any.
Please,
don't forget to show me your results next Monday-Tuesday (even if you don't finish it), before the
next part is live :)


Merci pour cette magnifique fleur... Malheureusement,
ReplyDeleteImpossible de copier les images sur Word, afin de pouvoir broder ailleurs que devant l'ordinateur.. dommage,
du coup, je vais devoir abandonner ce projet qui était très sympa!!
Bonne journée à vous...
MIP : Il faut que tu "copier l'image" ou "enregistrer l'image sous"(selon le navigateur utilisé)sur le menu s'affichant avec le clic droit de la souris, à coller dans le document/fichier que tu souhaites, pour chaque image. Et simplement copier le texte. Ca fait long, mais ça vaut peut-être la peine....
DeleteRavie de voir que je ne suis pas la seule française à suivre Amina. J'ai quelques lacunes dans mon vocabulaire anglais technique ; il faut souligner que les traducteurs n'aident pas toujours.
Prends soin de toi, Chantal
I'm afraid I didn't understand the problem, translator wasn't helpful. Thank you, Chantal, hope it solves the issue!
DeleteThanks a lot Amina take time to share your knowledge !! Sincerely, Chantal from France
ReplyDeleteThank you for following along despite the language barrier, Chantal! Much love to France ❤
DeleteHi, I'm subscribed, but I didn't receive the challenge pattern..could you please send it to me, thanks💕
ReplyDeleteHi!
DeleteThe pattern was distributed to all subscribers on April 5th, please check spam folder if it didn't show up in your inbox.
If you subscribed after that, please check the Resources Library, the pattern is stored there now!
In case you forgot how to access it, check the first Welcome message that you received after signing up :)
I didn't the pattern.. It's neither in inbox nor spam folder😩
ReplyDeleteHi, Reecha!
ReplyDeleteAre you subscribed? Check the first "Welcome" letter that you received, find information about the Resource Library and how to access it. The pattern is stored there now!
I wanted to thank you for this excellent read!! I definitely loved every little bit of it. I have you bookmarked your site to check out the new stuff you post. Arita porcelain
ReplyDeleteIt is especially decent, though look into the tips during this home address. livrare flori cluj
ReplyDelete